H G Tut H C DT A F FB E P E Image Map
Showing posts with label Crackle Paste. Show all posts

Monday, February 20, 2017

Celebrate Birthday Cards for Wild Orchid Crafts

Happy Monday!! I hope you had a wonderful weekend!! It's my turn to post on the Wild Orchid Crafts blog and I'd love for you to stop by and visit me there :) I have a couple of celebrate cards to share with you today.


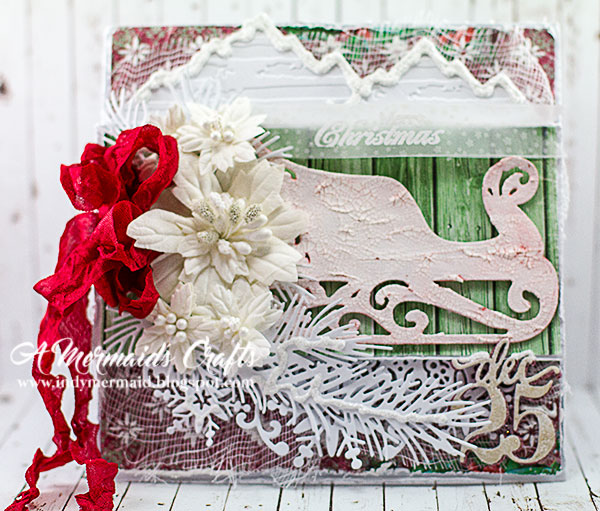
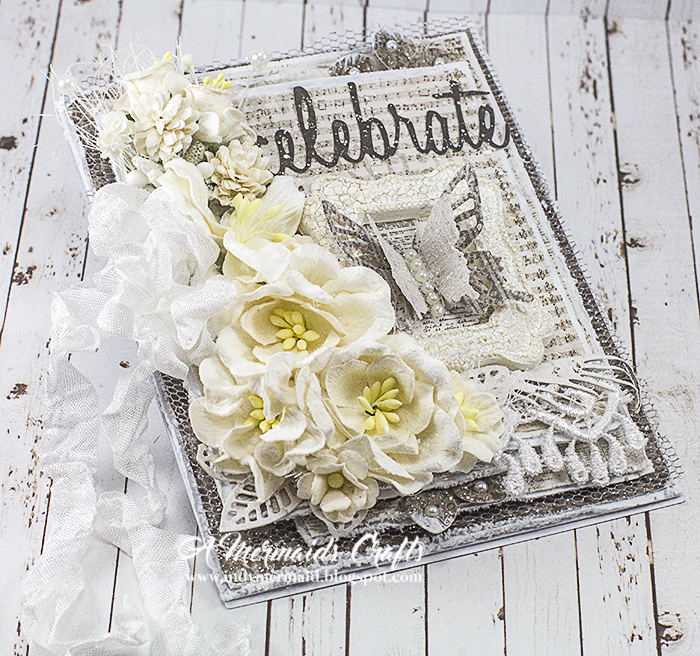
For these cards, I used Magnolias, Lilies, Gardenias, Apple Blossoms and Sweetheart Blossoms. The papers are Maja Designs and the crinkle ribbon is from DL.ART. The frame was coated with crackle paste for added texture.


For this cluster, I used White Daffodils, White Gypsophilia, White Aster Daisy Stems, White Bead Berry Sprays, White Pearl Spray and White Sisal.


Along the bottom, I used Off-White Guipure Lace.


For this cluster, I used Pale Pink Hip Roses, Baby Pink Gypsophilia, Baby Pink Aster Daisy Stems, Baby Pink Bead Berry Sprays, Pearl Sprays and White Sissal.

I am entering these in the following challenges:

1) Simon Says Stamp Wednesday Challenge - Fantastic Florals
2) Word Art Wednesday - Anything Goes
3) Jo's Scrap Shack Funday Friday - Anything Goes
4) Scrapping4fun Challenge #84 - Anything Goes
4) Little Scrap Pieces Show It Off Saturday - Anything Goes


Wild Orchid Crafts Products Used:


Thanks so much for stopping by!!
Have a great day :)
Lisa

Thursday, December 8, 2016

DL.ART Thankful Thursday #194 - Any Winter Holiday

Happy Thursday, everyone!! It's time for a new Thankful Thursday challenge at DL.ART!! The theme with week is Any Winter Holiday. If you used the code l01210, Diana will give you 10% off your purchase at DL.ART.


For my cards, I used papers from Lemoncrafts Christmas Greetings stack.


Texture paste was applied through a stencil for the background.


The mountains are an Elizabeth Crafts Skis die. They were embossed and then given a dusting of snow (DecoArt Snow Writer and Sparkle N Sprinkle Crystal Ice glitter).


The sleigh is an Xcut Reindeer and Sleigh die. I used the same technique as the sled on yesterday's card...DecoArt Crackle Texture Paste and then when it dried, it was covered with DecoArt Antiquing Cream and then wiped off, leaving it in the cracks.


A Joy Crafts Banner die was cut with textured vellum. Merry Christmas was embossed with Sparkle N Sprinkle White Detail Embossing Powder.


The poinsettias are from Wild Orchid Crafts. Tucked underneath are Impression Obsession Pine Sprigs and Impression Obsession Pine Branch dies. This gorgeous crinkle ribbon is Christmas Green from the Traditional Christmas Bundle.


It's a little hard to see in the pictures, but a Precious Marieke Snowflake Border die is along the bottom of the woodgrain paper. Dec 25 is a My Creative Time die, covered in Sparkle N Sprinkle Crystal Ice glitter. This beautiful ribbon is Christmas Red from the Traditional Christmas Bundle.


I am entering this in the following challenges:

1) Word Art Wednesday - Anything Goes
2) Sparkle N Sprinkle December Challenge - Anything Goes


Now it's your turn!! Head on over to DL.ART to see the amazing projects my design team sisters have created for today's challenge!! Then link up your Any Winter Holiday project!! I can't wait to see what you create :)

Monday, September 5, 2016

Anything But Cute Challenge #17 - Friendship

Happy Monday and happy Labor Day to all my friends in the USA!! I hope you had a wonderful weekend!! It's time for a new monthly challenge at Anything But Cute!!


The sweet and talented Branka of Vintage Homemade is our fabulous hostess this month and she's chosen the theme "Friendship". Here's what she had to say about the theme:


Friendship is a relationship of mutual affection between two or more people. We want you to show us a mixed media creation that's inspired by friendship. You can create anything, from tags to art journal pages but make sure it's a mixed media piece. Let's celebrate friendship together!


For my project, I created a friendship canvas for one of my oldest friends, incorporating several of her favorite things. I started with an 8 x 10 canvas and flipped it over. I covered the canvas with gesso and then applied drywall tape to the edges.


Next, I applied crumpled white tissue paper to the center for texture.


I added texture paste through a Tim Holtz Brick stencil to the background.


For added texture, I applied crackle paste to a piece of heavyweight cardstock and applied it to the canvas. I also added the crackle paste to the sides using the brick stencil. I applied paste through a Crafter's Workshop Art Is stencil as well (not pictured).


Now to fill in the background. I used a Cuttlebug die to cut the flowering vines in cardboard.


I cut other pieces in cardboard and covered them with gesso.


I added some some chipboard pieces, buttons and lace, as well as the friends forever wood pieces. I coated the entire canvas with gesso. This is where things went a little sideways. I wanted to use my Finnabair Mica Powders to color the canvas, but my experiment was a huge disaster. I'm too embarrassed to show you what it looked like, so I covered the entire canvas with black gesso and started again :)


This time, I used several different colors of Viva Decor Inka-Gold. After I had the canvas the colors I wanted, I used white gesso and a dry brush to highlight different parts of the canvas.


I am entering this in the following challenges:

1) Jo's Scrap Shack Funday Friday - Anything Goes
2) Simon Says Stamp Wednesday Challenge - Anything Goes
3) Emerald Creek Dares - Anything Goes
4) A Vintage Journey - Create Within a Frame
5) Creative Artiste - Anything Goes Mixed Media


Now it's your turn!! Head on over to Anything But Cute to see the amazing projects my design team sisters have created for today's challenge!! Then link up your mixed media Friendship project!! I can't wait to see what you create :)

Tuesday, July 5, 2016

Anything But Cute July Challenge - Summertime Fun

Happy Tuesday!! It's time for a new challenge at Anything But Cute. The sweet and wonderful Anne of Redanne is our hostess for this month's challenge and she has chosen the theme "Summertime Fun". Here's what she has to say about the theme:


What does Summertime fun mean to you? Spending time by the seaside, foreign travel, camping in the great outdoors or simply enjoying time in the garden? Create a MIXED MEDIA project focusing on how you like to spend your Summertime. Don't forget to tell us how your project relates to our theme.


Summer to me means the beach. I love spending time by the water, whether it be a creek, lake or the ocean. For my summertime project, I created my perfect vacation spot...a cabin by the ocean :)


I started by covering the canvas in super heavy gesso, using a pallete knife to give it texture. I added some crackle glaze to the corners and let it dry.


Next, I started building color. I used sprays and gelatos in colors of yellow, green, blue and tan.


More color, using DecoArt Media Sprays and Dylusions Sprays.


Once the colors dried, I used Paper Artsy Grunge Paste to adhere cheesecloth to the bottom of the canvas, as well as Liquitex Glass Beads gel.


To create the rocks, I cut thin pieces of styrofoam packing material into rock shapes. Then I mixed gray and metallic paint to cover them.


On the part I wanted to be the sandy hill, I dabbed on acrylic paint and while it was wet, I covered it with real sand.


For my shabby beach cottage, I used a Tattered Lace Cabin die. I covered it using Andy Skinner's Mega Crackle technique.


I selected what die cut pieces I wanted to use and cut them in grunge board. I then covered them with gesso. I sanded down the fence for a shabby look and used acrylic paint and distress ink to color the remaining pieces.


Mr. Pelican enjoying the view :)


I used gesso to create the sea foam.


A close-up of the crackle texture.


The sign is a Die-Versions Life is Better at the Beach Cute Cube. I covered it in gesso and then used DecoArt Antiquing Medium. Viva Inca Gold Metallic Rub was randomly brushed over it. I adhered the cube to a piece of double sided tape and then covered it with sand.

I am entering this in the following challenges:

1) Simon Says Stamp Wednesday Challenge - Anything Goes
2) Dies R Us - Outdoor Fun
3) Little Scrap Pieces - Show If Off Saturday
4) My Sheri Crafts #185 - Down At The Beach


Now it's your turn!! Head on over to Anything But Cute to see the amazing projects my design team sisters have created for today's challenge!! Then link up your Summertime Fun mixed media project!! I can't wait to see what you create :)

Sunday, June 5, 2016

Anything But Cute June Challenge - The Birds and the Bees

Happy Sunday!! I hope you are having a wonderful weekend!! It's time for a new challenge at Anything But Cute!! The sweet and fabulous Niki of Pawsitively Creative is our hostess and she's chosen the theme "The Birds and the Bees". Here's what she has to say about the challenge:


With the lovely warm weather in my neck of the woods, I am seeing so many wonderful birds and bees, so I would love to see those in your mixed media makes! Pull out those bird stamps, think of feathers and maybe some honeycomb. Or you could even go for a non-traditional interpretation like a family crest that has a bird emblem on it. The sky is the limit but NO BUTTERFLIES please!


When I sat down to work on my project, I was totally positive I was going to create a card with birds...imagine my surprise when it ended up being all about bees instead :)


I started with a background created with various colors of brushos. I then used Liquitex Texture Paste through a honeycomb stencil...okay, it's actually a reverse chicken wire stencil, but I thought it looked like a honeycomb :)


I then used a TCW Chicken Wire stencil with DecoArt Crackle Paste for the strip of paper behind the sentiment. I used the same stencil with with Squeezed Lemonade and Mustard Seed Distress Inks on the label.


The bees are a Spellbinders die. I masked off the tail and inked it with Squeezed Lemonade Distrss Ink and then Mustard Seed towards the end of the wings for a subtle ombre effect. I then masked the body and Inked the tail with Black Soot Distress Ink.


The bee was then covered with DecoArt Crackle Glaze. I cut a black base layer and attached them with foam tape for added dimension.


There are several layers to the card. The edges of the papers were distressed with a Zutter DIA.


I had to give a nod to our feathered friends by adding a feather among the Wild Orchid Crafts flowers and ribbon from DL.ART.


Now it's your turn!! Head on over to Anything But Cute to see the amazing projects my design team sisters have created for today's challenge...I guarantee they will inspire you!! Then link up your mixed media Birds and Bees project (remember, no butterflies and no cute images)!! I can't wait to see what you create :)

LinkWithin

Related Posts Plugin for WordPress, Blogger...