

Hi everyone and happy Saturday!! I am taking over my sweet friend Jo's blog today!! I was so honored when she asked me to guest design and couldn't wait to create a project to share with you. I'd love for you to hop on over to Jo's Scrap Shack and say hi :)

Last week marked the first day of spring - yay!! So I've created a couple of easel box cards to celebrate the new season :) There are tons of tutorials on how to make these, but I just kind of winged it and created my own. I took a few pictures and threw together a quick tutorial. I wanted my card to be 5x5 and the depth of the box at 1", so using those measurements, you will need:
Box Base

1) Start by scoring the 5 x 11 cardstock at 1 7/8", 3", 8" and 9 1/8". I added an eighth of an inch to each side so that the box would slide easily. Also, the reason I used 8 1/2 x 11 cardstock is because I have it in heavyweight...I don't have any 12 x 12 that I thought would be heavy enough to use as the base. I used Neenah Solar White Cardstock in 110lb. weight.

2) Fold at the score lines. It will look like the picture above. Apply glue and adhere the 5 x 5 piece of cardstock to the base.

3) It will look like this when you are done. This will be the sleeve for the box.

4) Score the 7 x cardstock at 1" on all four sides.

5) Fold the score lines. Cut the lines pictured above. I always make the cuts a slight triangle so that the sides match up better when glued together.

6) Fold the end pieces up and adhere glue.

7) Glue the end pieces so that it forms a box.

8) The box will now slide easily into the sleeve.

9) To decorate the inside box, I used two pieces of 1 x 6 patterned paper and 2 of 1 x 5.

10) I scored the 1 x 6 pieces at 1/2" from each end and then wrapped them around each end of the box to add a little more strength to the corners of the box. I then adhered the 1 x 5 pieces on the other two sides. I did the same thing on the inside and then added the 5 x 5 patterned paper to the bottom.

Easel Card

1) Score the 5 x 10 cardstock at 2 1/2" and 5".
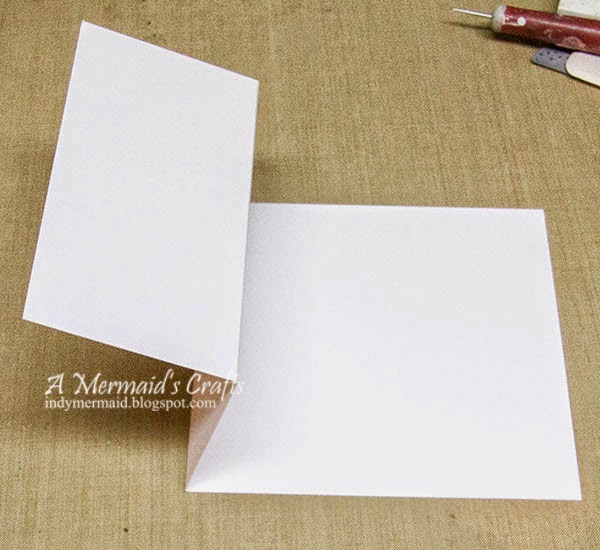
2) Fold as shown with a mountain fold at 2 1/2" and valley fold at 5".

3) Adhere the 5" end to the top of the box. On the 2 1/2" end, apply adhesive and adhere the 5 x 5 cardstock.

4) Your easel box will now look like this. Time to decorate!!

The papers for both of my boxes are from Prima. The edged were distressed with a Zutter DIA. The flowers are from Wild Orchid Crafts.

I used heavy-duty burlap for the handle, and several dies for each box.

They are now ready to fill and give as gifts!! I want to sincerely thank Jo for having me guest design today!! Thanks for stopping by and have a wonderful weekend :)
Last week marked the first day of spring - yay!! So I've created a couple of easel box cards to celebrate the new season :) There are tons of tutorials on how to make these, but I just kind of winged it and created my own. I took a few pictures and threw together a quick tutorial. I wanted my card to be 5x5 and the depth of the box at 1", so using those measurements, you will need:
Box Base
- 1 - 5 x 11 cardstock
- 1 - 5 x 5 cardstock
- 1 - 7 x 7 cardstock
- 2 - 1 x 6 strips of patterned paper
- 2 - 1 x 5 strips of patterned paper
- 1 - 5 x 5 piece of patterned paper for inside of box (may have to trim slightly)
1) Start by scoring the 5 x 11 cardstock at 1 7/8", 3", 8" and 9 1/8". I added an eighth of an inch to each side so that the box would slide easily. Also, the reason I used 8 1/2 x 11 cardstock is because I have it in heavyweight...I don't have any 12 x 12 that I thought would be heavy enough to use as the base. I used Neenah Solar White Cardstock in 110lb. weight.
2) Fold at the score lines. It will look like the picture above. Apply glue and adhere the 5 x 5 piece of cardstock to the base.
3) It will look like this when you are done. This will be the sleeve for the box.
4) Score the 7 x cardstock at 1" on all four sides.
5) Fold the score lines. Cut the lines pictured above. I always make the cuts a slight triangle so that the sides match up better when glued together.
6) Fold the end pieces up and adhere glue.
7) Glue the end pieces so that it forms a box.
8) The box will now slide easily into the sleeve.
9) To decorate the inside box, I used two pieces of 1 x 6 patterned paper and 2 of 1 x 5.
10) I scored the 1 x 6 pieces at 1/2" from each end and then wrapped them around each end of the box to add a little more strength to the corners of the box. I then adhered the 1 x 5 pieces on the other two sides. I did the same thing on the inside and then added the 5 x 5 patterned paper to the bottom.
Easel Card
- 1 5 x 5 cardstock
- 1 5 x 10 cardstock
- Embellishments
1) Score the 5 x 10 cardstock at 2 1/2" and 5".
2) Fold as shown with a mountain fold at 2 1/2" and valley fold at 5".
3) Adhere the 5" end to the top of the box. On the 2 1/2" end, apply adhesive and adhere the 5 x 5 cardstock.
4) Your easel box will now look like this. Time to decorate!!
The papers for both of my boxes are from Prima. The edged were distressed with a Zutter DIA. The flowers are from Wild Orchid Crafts.
I used heavy-duty burlap for the handle, and several dies for each box.
They are now ready to fill and give as gifts!! I want to sincerely thank Jo for having me guest design today!! Thanks for stopping by and have a wonderful weekend :)

