

TO ENTER MY 1,000 FOLLOWER GIVEAWAY, CLICK HERE!!

Welcome to the "Back to School" Getting Cricky Blog Hop!!
We're so happy you could join us for this month's Getting Cricky Design Team Blog Hop!! We'd like to invite you to visit each of our DT Sisters' Blogs and our very special Guest Designer, An'Jenic of AJ Scrapbooking & Cards!!
Throughout the hop we'll be showing all kinds of back to school projects!! We hope you'll enjoy each and every project along the way!! Sooooo, let's get hopping...
If you've hopped along from our Guest Designer AJ, then you are in the right place!! If you are just joining me from your dashboard, or reading this via email, please be sure to CLICK HERE to start at the beginning with Kristal's blog (you'll want to catch up on all the FUN!!)
Each of Kristal's stamp sets benefit charity. At least $1 per stamp set goes to benefit the charity noted on the stamp set package. Kristal is donating to the following charities: Cancer Angels, Storefront Shelter for Homeless Children, Intrepid & Fallen Heroes, E. Glaser Pediatric AIDS Foundation, Doorways Shelter for Women & Children (Domestic Violence), Wayside House for Women, Camp Good Days & Special Times, Adopt a Classroom, and Autism Research Institute. Kristal will donate $1 for every stamp set sold, retail or wholesale to the charity noted; and over time believes this will add up to some wonderful miracles for these special people. So you can feel good that each time you purchase a K Andrew Designs art stamp set, someone around the country is receiving some good help!
K Andrew's stamps are all made and assembled here in the USA, which is very important to Kristal. This ensures all product materials are safe and that jobs are being provided and maintained here in America. You can learn even more about Kristal's stamps (and pick some up for yourself) by visiting her online store: K Andrew Designs:

Kristal's stamp sets are perfect for cards, layouts, and so much more...
For my project, I'm featuring the Pirate Tales & Fish Scales and Pirate Party stamp sets:


For this Back-to-School project, I started with a Paper Mache treasure chest from Michaels.

Brown cardstock from The Paper Studio was embossed with The Paper Studio's Woodgrain embossing folder and then Tim Holtz Walnut Distress Stain was rubbed over the paper and wiped off to bring out the ridges. The paper was cut into strips to look like wood planks. The wood strips were adhered around the middle and top with Mod Podge. Strips of the same paper were sanded and then rubbed with the Walnut Distress Stain and wiped off. These were adhered with Mod Podge as well.

All of the holes for the brads were drilled and then fitted with the brads. The corners are Tim Holtz Corners. The flag was cut from Paper Doll Dress Up and the skull from Life's A Party. Both were distressed and Mod Podged.

The lock is a Tim Holtz Keyholes. 1" Ball Knobs from the Wood Shoppe were painted with Burnt Umber paint and adhered to the base for feet. All of the stamps are from Kristal's Pirate Tales & Fish Scales and Pirate Party stamps. They were stamped on white paper and then distressed with Vintage Photo and Walnut Distress Ink and Mod Poged.

The inside was covered with ATD Specialty Paper and then distressed for an aged look. I used maps so any little pirate could plan their search for hidden treasures :) There is plenty of room for pencils, glue and all kinds of school supplies. But wait...
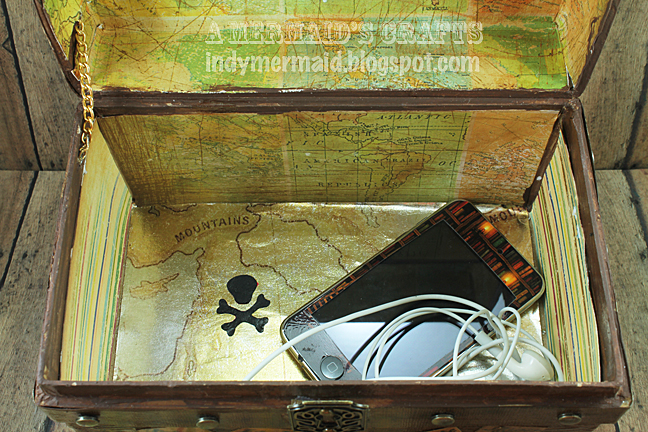
There's a false bottom so kids can hide all their pirate booty, like the iPod teachers won't let them listen to, or a map with the real treasure location (marked by the negative of the flag cut on the top).

I am entering this in the following challenges:
- Cooking With Cricut Challenge #99 - Back To School
- Joyful Stamper's Inspire Me Friday #72 - Anything Goes
- DL.ART Happy Birthday Linky Party - Anything Goes

.......................................

58 comments:
Lisa this is just amazing! The detail and work you put into this is astonishing. You make my mouth drop girl. Will you come make my kids stuff for school? You rock!
I don't even have words for how amazing this is! It looks like a real treasure chest! And I love the way you even covered the inside with the map paper . . . and the false bottom. AWESOME!!!!
Shawn ~ Getting Cricky Design Team Member
Crafty Chics Blog
and
MyCutSearch.com ~ Find your Cricut images FAST!
Webmasters Earn Money Here!
Wow if I hadn't read the post I would have thought that it was an old chest that you just put the stamps on!! Amazing job so realiistic!!
Kristan
I totally thought this was a chest you decorated! Totally impressed that you made this look like real wood and I absolutely love the pirate theme! Great job Lisa!
Melanie
http://thepaperretreat.blogspot.com
This is seriously the coolest thing EVER. It looks so big and an actual real pirates chest. Great Elements and Details. My son's would love this. Awesome Job like always my friend. Have a Great Weekend.
Wow Lisa this is so cool. And I can't believe their is a false bottom. Fabulous.Now I wish I had a treasure chest. :-)AJ-
I am just stunned by this amazing treasure chest Lisa! I keep looking at the photo again and again. I would not have believed that it wasn't a real, wooden trunk if you hadn't said so...lol! What an amazing eye for detail you have. I just love the hidden bottom, what kid wouldn't love to have this...awesome, awesome, awesome!
i cant begin to tell you how much i love your project. thanks for sharing your talents with us all.
What an AWESOME project! Love the false bottom! TFS!!!
I love your project Lisa!! Its so cool!!
Veronica
mommyscraftycreations.blogspot.com
mommyscraftycreations at gmail dot com
Oh wow, Lisa!!! The detail on this box is amazing!!! It looks like a real wood box. And I love how you've embellished it! This is FABULOUS!!!
Love-love-love this!!!
Good luck on getting your 1000 followers -- should be a cinch for you!!!
This is fantastic, Lisa!!! A lot of work but with an awesome end product!!
How fun to have the false bottom!!
Wow! I'm having such a hard time wrapping my head around the fact that you started with a plain ol' paper mache box. This is fantastic!!
OMGosh girl this is AMAZING!! I thought it was a real box too and the false bottome...genius status :D LOVE, LOVE, LOVE it!!
The Captain Jack Sparrow fan in me says you'll not walk the plank with this wonderful treasure chest unless you do not make one for me. Hint hint. Fun hop. My Daughter headed back to college this morn to start her Junior yr. I'm missing her already.
Melissa
"Sunshine HoneyBee"
WOW!! What an amazing project!! I love seeing what you create! TYFS :)
Amanda
cricktncrafts.blogspot.com
Absolutely beautiful. What a transformation. WOW. TFS.
dmcardmaker (at AOL)
Ok, so I'm going to HAVE to come back for the directions for this one. You did a fabulous job on the treasure chest. But I don't think you'd do anything different. TFS! Scrappy Hugs!!!
Christel
GCDT Sister
Scrappin’ Sista Designs
This project is amazing! My little guy loves pirates but his school is so picky about what they bring. Maybe I can CASE it for his craft supplies though. Thanks for sharing this great stamp company too!
Wow oh wow Lisa~
How amazing, I practically was choking when I kept reading your post... Simply amazing, who would of even think of something so creative like this... Of course only Lisa!
Great project my friend...
Oh Wow! This is spectacular Lisa. Love all the embellishments and texture. So cute.
Wow this is a great treasure chest!! I love it!! You did awesome on it!!
Angela
http://angelascraftyspot.blogspot.com/
Wow just love it.I love all the the work in this box.The mod podge and walnut make it look so real.Love all the embellishments on box.love love love it.
Awesome creation Lisa It looks like a real treasure box, actually it is for some lucky kid. Thanks for joining my DL.ART happy Birthday linky party (in advance)
Have a great weekend my friend see you Sunday
DIANA.L
http://dianamlarson.blogspot.com/
WOWZERS my friend!! This is simply AWESOME!!! Love all the details you added, the colors, textures and embellishments are amazing!!! You totally rocked this!!!!
This is one amazing project I know I would love to have!!
TFS and have a GREAT weekend!!
Lisa that's awesome!!! what a lot of work and detail.
This is just way too cute and a fantastic project! You have the most wonderful 'visions' when you start a project :)
Sheri R
sherii at cfl dot rr dot com
All I can say is AMAZING!
WOW this would be a treasure for any little boy. Love it.
Nana
♥ My Crafting Channel ♥
Email Me
I just plain can't believe it - I thought at the beginning that this was just an old trunk you have just added some stamped words and die cut images, but when I red how you have made it - it just amazes me!
Hugs,
Liva ❤
OMG! Lisa from a plain box to a wonderful treasure trunk. I showed it to my husband and he thought it was fabulous and from the picture he thought it was actual life size. That is until I showed him the next picture and he saw the pencils. LOL! He loved it. You did a fabulous job. Hope you have a fantastic day.
Cindy Lou
this box looks like the real thing wooden and all omg you are amazing you are so talented my friend great job and I love it. hugs
Wow this is soooooooo cute!!!
Wow! you'd never know this wasn't a wood treasure chest. How fun to hide those special goodies and what an amazing project. YOU, my friend, are beyond talented!
Hugs,
Larelyn
Amazing project, my sweetest friend! The details are fabulous as always, and I think my favorite parts are how realistic the "wood" looks and the false bottom! :o) You did such a marvelous job with the embossing and staining. Creative and spectacular, as are all of your projects! (Forgive the brevity, my friend! I wanted to leave you comment love, but am not feeling so well!) Have a beautiful weekend, Lisa!
Hugs and blessings!
http://kaleidoscopicsparkles.blogspot.com
Oh My goodness gracious, Lisa! Your treasure chest is amazing!!! Wow! Wow! Wow!!
Hello My FAB friend!You ROCKED this!For a second I though it was a Big Chest that you found and just added Stickers...LOL...But I thought no way...So I said let me continue reading the post...WOW!My friend you left me speechless...This is AMAZING!!Fabulous as always but TRULY AMAZING!!Love it!
Hope your day is filled with lots of sunshine!!!
Enjoy your weekend!
Migdalia
Wow, this is such a fun idea. TFS.
Wow this is so awesome. I used to teach first grade and the kids would have loved this. Thanks so much for sharing at CWC.
can't imagine a school kid that wouldn't be thrilled to have this wonderful box to store their school treasures. Karen
Once again you have amazed me my friend. This was so fun and any little mate will love it.
Cheri
DJ's Sundries
Love your treasure chest; it's so fun!
Oh, wow! That is absolutely AMAZING!! I don't even know what to say because I'm in such 'awe'.
GREAT project!!!!... Thanks so much for sharing :)) and best of luck in your challenges :))
rrandrr@insightbb.com
Wow Lisa, this is totally awesome.. it must have taken your a while to complete this but was well worth all the time you put into this... hugs
Incredible! Loved it!
Wow , Wow, Wow......what a fabulous transformation, LOVE IT!
This is so unique....what a fun project...now you make me want to run to Michaels and buy one....such a darling idea!! It look slike a real treasure chest!!
The chest is jus fantastic and I like the versatility of it.
marg0006 at verizon dot net
OMG, Lisa!!!
You have really outdone yourself. this is simply stunning!!
Kathy
Salido99@msn.com
http://3spoileddogs.blogspot.com/
OMG!!!! This is FABULOUS Lisa!!! TFS
Liz
Oh Lisa, you are simply incredible! What a gorgeous box!
Hugs and smiles
How cool is this???? You are so stinkin' talented and I love your thinking outside of the box ability!
Wow! Love the decor! Amazing. Great way to make it fun.
Hugs,
Patty
Getting Cricky DT Sister
Lisa, I have no words....This is AMAZING!!!! Just love all the detail you have put into this project!!
Cheers Jennie DT sister
Jenscrapstoo
Lisa, I just Love, Love, Love this box. I love the wood grain effect and the colour and how you added the "rivets" to the straps of the chest. The inside looks incredible with the map. I love it all. Its truly a masterpiece. Lee x
OMG!!!!! This chest is AMAZING!!!! When you look at the picture you would swear it is real!!!! You have outdone yourself, every detail is perfect!!!!!
Did I tell you this is amazing?
Wow, wow, wow!!!!
I know I am hopping late but this is so amazing Lisa!! I don't know how you think of this stuff but it soooo unbelievably AWESOME!!!
Post a Comment