H G Tut H C DT A F FB E P E Image Map
Showing posts with label Dylusions Stencils. Show all posts

Saturday, December 19, 2015

Merry Christmas Mixed Media Card

Happy Saturday!! I hope you are having a wonderful last weekend before Christmas!! So much to do, so little time left...only six days!! Eek!! I have one more scheduled DT post on Christmas Eve but otherwise, I probably won't be around blogland much until the new year. I do have a mixed media Christmas card to share with you today :)


I started with heavyweight watercolor paper and adhered a crumpled up sheet of tissue paper to it with Claudine Hellmuth Multi Medium. Then I applied a coat of Gesso and let it dry. Next, I used Wendy Vecchi Texture paste with a The Crafter's Workshop Art Is stencil and a Dylusions leaf stencil. Once it dried, I used Twinkling H2O's in various shades for a shimmer effect and some Viva Inka Gold Metallic Rub. Then I sprayed some Dylusions Cherry Red and Postbox Red and dabbed it off. I sprinkled some Shabby White Embossing powder in random places for a bit of texture and used a Deco Art Snow Writer as well. Merry Christmas is a My Craft Spot stamp (no longer in business). I stamped it on tissue paper and then used Multi Medium to adhere it to the card.


I used the same technique for the Spellbinders Poinsettias as I did on my previous card...I wet the paper and when it was damp but not so wet that the paper would tear, I wrapped the petals around a paintbrush and then used flat pliers and scrunched the sides together. I then brushed Iridescent Red Twinkling H2O's over the petals but you can't see the shimmer at all in the pictures. I tucked Impression Obsession Pine Sprigs, cheesecloth and baby's breath under the flowers.


I cut the Memory Box Large Winter Sled in Grungeboard and then covered it with Festive Berries Distress Ink. Then I layered Deco Art Crackle Glaze on top. Once it dried and cracked, I dabbed Gathered Twig Distress Ink on top to highlight the cracks. Dec 25 is a My Creative Time die. It was covered with Shabby White Embossing Enamel.


The gorgeous crinkle ribbon is Six Fathoms from the DL.ART The Mermaid Tale bundle. The button is a Poppy Stamps Stitched button die. The snowflake is from Hobby Lobby. I covered it with gesso and then Shabby White Embossing Enamel and heat set it.


I am entering this in the following challenges:

1. Anything But Cute #8 - You've Got Happy Mail


2. Simon Says Stamp Work it Wednesday - Holiday Cards
3. Little Scrap Pieces - Show it off Saturday
4. 2 Creative Chicks Monthly Challenge - Anything Goes
5. Pause Dream Enjoy Linky Party- Anything Goes
6. ChouxChoux Paper Art Visions of Sugarplums Challenge - Christmas/Winter
7. Simon Says Stamp Wednesday Challenge - Die Crazy
8. Crafting By Designs - Here Come the Holidays
9. Creative Card Crew - Holiday Season
10. Emerald Creek Dares - Celebrations Around The World

Thanks so much for stopping by!! Have a wonderful Christmas week :)

Wednesday, July 3, 2013

Star Spangled Happiness!!

Happy Wednesday and happy 4th of July eve to all of my friends in the USA!! I hope you have fun plans for tomorrow...cookouts, maybe a party, fireworks :)


I have a Patriotic page to share from my journal. The page was spritzed with water and then Dylusions Sprays in Cherry Pie, Postbox Red, London Blue and Calypso Teal. Tim Holtz Picket Fence Distress Paint was lightly flicked over the surface. A Dylusions Starry Starry Night stencil was placed on the page and sprayed with water for a ghosting effect. Some of the stars were colored in with Cherry Pie, London Blue and a white Sakura Gelly Roll Pen. They were outlined with a white the Gelly Roll Pen and then with charcoal. A Tim Holtz splatter stamp from the Spooky Stuff set was stamped in Picket Fence Distress Paint for the effect of fireworks. They were then covered with Ranger Rock Candy Distress Stickles for sparkle. The circles around the border were created with a Wendy Vecchi Dots & Stripes Border stencil, as were the stripes along the bottom. They were created with Wendy Vecchi Embossing Paste.


Julie Nutting's Prima Doll Stamp - Mia - was stamped on book paper. Her top, headband and shoes were created with a Wendy Vecchi stripes stamp from the It's More Flower Art set and Dylusions spray in Calypso Teal. Her skirt was made with a Crafter's Workshop Punchinella stencil and Dylusions spray in Postbox Red. Mia was then outlined with a white Sakura Gelly Roll pen and charcoal.


The sentiments are all from K Andrew Designs Sweet July stamp set. I couldn't decide which sentiment to use, so I used them all :) They were stamped on watercolor paper and spritzed with Dylusions sprays. They were then outlined with the white pen and charcoal.

I am entering this in the following challenges:
  1. Simon Says Stamp - Patriotic
  2. Simon Says Stamp and Show - Anything Goes
  3. DL.Art - Thankful Thursday #112 - Patriotic
  4. Sunday Funday #11 - Linky Party
  5. Inspire Me Friday #109 - Anything Goes
Thanks so much for stopping by!! Have a SAFE and HAPPY 4th of JULY!!

Friday, May 24, 2013

Little Scrap Pieces Fun Friday - Let's Hear it For the Red, White and Blue

Happy Friday!! I hope you had a wonderful week!! For all of my USA friends, I hope you have fun plans for the Memorial Day weekend!! Stay safe if you are traveling!! I'm away and won't be back to mid-week, so I probably won't be able to visit you for a few days. I will try to check in but I can't make any promises :)


Friday means a Fun Friday Challenge at Little Scrap Pieces!! For our challenge this week, we want you to use red, white and blue on your cards, layouts or projects :)


The base of my red, white and blue card is heavyweight cardstock from Canvas Corp. The bottom layer was sponged with Tim Holtz Fired Brick Distress Ink, the next layer with TH Faded Jeans Distress Ink. The top layer was inked with TH Old Paper and Tea Dye Distress Inks.


For the background flag, the stars are a Dylusions Starry Night stencil, inked with Faded Jeans  The stripes are a Wendy Vecchi Studio 490 It's More Flower Art Stamp, inked in Fired Brick. The Statue of Liberty and USA are from the Tim Holtz Mini Blueprints 2 stamp set. The backgrounds of both were inked with Old Paper and Tea Dye. The Statue was colored in with a Peeled Paint Distress Marker and a TH waterbrush. USA was colored in with Fried Brick, Picket Fence and Faded Jeans and a waterbrush.


I am entering this in the following challenges:
  1. Simon Says Stamp and Show - Favorite Ink (Fired Brick)
  2. DL.Art Thankful Thursday- May Linky Party
  3. Sunday Funday #9 - May Linky Party
Now it's your turn!! Head on over to Little Scrap Pieces to see the amazing projects my talented design team sisters have created for today's challenge. Then link up your Red, White and Blue project...I can't wait to see what you create :)

Friday, April 12, 2013

Little Scrap Pieces Fun Friday - May Flowers

Happy Friday!! I can't believe how fast this week went by. I hope you have fun plans for the weekend!! It's chilly and rainy here today...all part of the April showers that bring...May flowers. And that's the theme for this week's Fun Friday Challenge at Little Scrap Pieces. We want to see you use a flower on your project. Our sponsor this week is our super-talented and super-sweet design team sister Sherrie of Sherrie Scraps With Passion :)


Last week I created one side of a journal page for the April Showers page, so I thought I'd do the other side for May Flowers :)


The base is heavyweight watercolor paper from Strathmore. It was spritzed with Dylusions inks in Calypso Teal, Vibrant Turquoise, Fresh Lime and Cut Grass. A Crafter's Workshop Cosmic Swirls stencil was placed over the top and sprayed with London Blue Dylusions Inks. A CW Bricks stencil was placed on the bottom and spritzed with Postbox Red. The bricks were outlined with Derwent charcoal and then highlighted with white charcoal. The sun is a stamp from Beeswax, stamped with yellow acrylic paint.  The letters were cut with a Tim Holtz Wanted die from scrap watercolor paper. They were outlined with charcoal, as were the edges of the page. The flowers are a Dylusions Background Love stamp, colored in with Tim Holtz Waterbrushes filled with Dylusions inks, and then outlined with Sakura Gelly Roll pens in white and black. The girl is a Dylusions Annie stencil, colored in with black acrylic ink. She was stamped with the script stamp from the Tim Holtz Mini Ornates set in white acrylic ink. She was outlined with white and gray charcoal.


I am entering this in the following challenges:
  1. Simon Says Stamp - April Showers or Spring Flowers
  2. DL.Art Thankful Thursday- April Linky Party
  3. Sunday Funday #8 - April Linky Party
  4. Inspiration Emporium - Masks and Stencils
Now it's your turn!! Head on over to Little Scrap Pieces to see the amazing projects my talented design team sisters have created for today's challenge. Then link up your May Flowers project...I can't wait to see what you create :)

PRODUCTS USED:

Friday, March 22, 2013

Hoo's Ready for Spring Blog Hop!!

For my 2nd Blogaversary Giveaway, click HERE!!

Hello! Welcome to the Hooo's Ready For Spring Blog Hop!


We are so happy that you could join us today!! In case this is the first time you have joined us for a hop, the awesome Heather Lynn of Random Recipes, Paper Crafts and Photos By HL and several friends put on an seasonal owl themed hop every 3 months. Spring is almost here so we decided to do a spring themed or spring colored projects this time. All of the participants are all so creative and inspiring -  you will not be disappointed!!

You should have arrived from the my sweet and amazingly talented friend Norma. If you've just stumbled upon the hop, you can start at the beginning with our fabulous hop hostess Heather Lynn's blog!!


The wonderful Pinque Peacock has offered to sponsor the hop. Please be sure to head over to the PP blog HERE and become a follower. Then, head on over to their Facebook page and see all of the beautiful items they have to offer! Here is the link...

Pinque Peacock Facebook Page- https://www.facebook.com/PinquePeacock?fref=ts

One lucky hopper that hops all of the way through and follows all of the blogs will win a $15 bundle from Pinque Peacock. That will include..

(4) Beaded Stick Pins
(6) Large Felt Poppers
(2) Layered Garden Beauties
(2) Large 1.5" Fabric Covered Buttons (FCB)
(6) Small 3/4" Fabric Covered Buttons (FCB)
(1) 2.5" Splendid Swirl (w/Embellished Center)

Thank you Pinque Peacock!

Heather Lynn will choose ONE winner next week!


For my project, I created another journal page :) The owl is a Spellbinders Nested Owls die, cut three and pieced together with two of the cuts. The third was used as a base with foam tape between the layers for dimension. The paper is from Prima Marketing's Doodle Deux paper stack. The branches are Spellbinders Cherry Blossoms dies. The flowers were inked with Tim Holtz Victorian Velvet Distress Ink and adorned with crystal gems. The branches and owl were adhered with Claudine Hellmuth Multi-Medium.


The base is heavyweight Strathmore watercolor paper. It was painted with a coat of gesso, and then acrylic paints in sky blue, soft apple and ballet pink. Bubblegum pink acrylic paint was brushed onto bubble wrap and stamped on the canvas. TH Peacock Feathers Distress Ink was sponged through a Crafter's Workshop Harlequin stencil, Bundled Sage through a CW Tile stencil, and Spun Sugar through a Dylusions Dotted Flowers stencil. Wendy Vecchi Embossing Paste was used through a CW Punchinella stencil. Victorian Velvet was sponged through a CW Branches stencil. The flowers along the bottom are from the Dylusions How Does Your Garden Grow stamp set and colored in with Funky Fushia, London Blue, Dirty Martini and Fresh Lime Dylusions sprays with waterbrushes. The script text stamp from the Tim Holtz Mini Ornates set was randomly stamped with Antique Linen Distress Ink. The sentiment is from Dylusions Quintessential Quotes stamp set. The sentiment and the edges of the paper were shaded with charcoal.

I am entering this in the following challenges:
  1. Simon Says Stamp and Show - Water (watercolor paper, waterbrushes)
  2. DL.Art - March Linky Party
  3. Sunday Funday #7 - March Linky Party
I have BLOG CANDY!!


All you have to do to win a TPC Studios Travel Collage stamp set is:
  1. Be a follower
  2. Leave a comment on this post
That's it!! I also have two other giveaways going on!! You can enter to win my 2 Year Blogaversary Giveaway HERE, and the Spring Blog Hop Giveaway HERE!! I will choose the winner of this stamp set on 3/29.

Next you will head over to the talented Paula's Blog to see the awesome project she has created!!

Here's the complete line up just in case you get lost along the way:

Heather Lynn - http://heathernovinger.blogspot.com
Jessica  - http://jessicascraftshaque.blogspot.com
Teresa -  www.createenjoyshare.blogspot.com
Norma G. - http://lilhoneybeestudios.blogspot.com/
Lisa - http://indymermaid.blogspot.com < YOU ARE HERE
Paula D. - http://scrapyourworld1.blogspot.com < NEXT
Cindy -  http://www.cindys-greencricut.blogspot.com/
Janet R - http://janetscreativeworld.blogspot.com/
Tara - http://www.craftindesertdivas.blogspot.com/
Carrie - http://paper-wings-productions.blogspot.com

Thanks so much for joining us today! Have a great weekend!

PRODUCTS USED:

Saturday, March 9, 2013

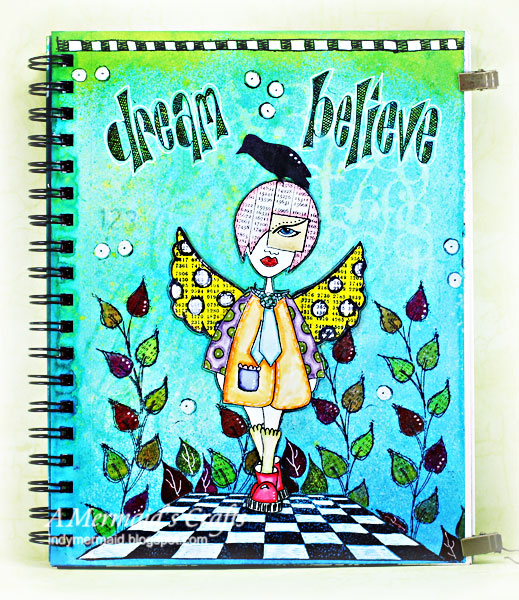
Dream Believe Art Journal Page

Happy Saturday!! I hope you are having a wonderful weekend!! It was sunny and in the 50's here so I got a jump on spring and grilled some burgers outside today :)


I've been playing around with my Dylusions sprays and stamps, and today I have a page from my journal to share with you :)


The paper was misted with water and then spritzed with Vibrant Turquoise and Calypso Teal. A Crafter's Workshop Numbers stencil was placed over the paper and spritzed with London Blue. More London Blue was sprayed along the bottom, and Dirty Martini was spritzed along the top. A Dylusions Number Jumble stencil was then placed over the paper and misted with water for a ghosting effect. The numbers stamp from the Dylusions Basic Backgrounds set was randomly stamped with Tim Holtz Weathered Wood Distress Ink. The border along the top is from the Dylusions Further Around the Block stamp set. It was stamped with black Ranger Archival Ink and colored in with a white Sakura Gelly Roll pen as was the checkered floor stamp from Beeswax Rubber Stamps. A mask was placed over the floor and then the vines were stamped around it. The long vines with numbers are from the Dylusions Around the Block stamp set, and the solid ones along the bottom are from the Doodle Parts set. They were colored in with TH water brushes filled with Cherry Pie, Postbox Red, Lemon Zest, Pure Sunshine and Squeezed Orange Dylusions sprays.


Dependable Dotty was stamped with Archival Ink and then colored in with TH Distress Markers in Spiced Marmalade, Dusty Concord, Peeled Paint, Mustard Seed, Worn Lipstick, Faded Jeans, Broken China, Barn Door, Fired Brick, Spun Sugar and Chipped Sapphire. The wings are from the Dylusions Doolally Dorris set. The bird is from the Birds on a Wire set. Dotty was outlined with a charcoal pencil to give a bit of depth. Dream and Believe are from the Word Love set, colored in with Lemon Zest and outlined with the Gelly Roll pen. The circles are from Paper Wings Productions Art Textures stamp set.


I am entering this in the following challenges:
  1. Simon Says Stamp and Show - By the Numbers
  2. Simon Says Stamp - A Bit O' Green
  3. DL.Art - March Linky Party
  4. Sunday Funday #7 - March Linky Party
  5. Craft It Up & Link It Up - Linky Party
Thanks so much for stopping by!! Have a great weekend :)

PRODUCTS USED:

Monday, March 4, 2013

Inaugural Craft It Up & Link It Up Linky Party

For the Paper Playtime Anything Goes Challenge, click HERE.

This is my second post of the day. I am so excited and honored to be a guest designer for the inaugural Craft It Up & Link It Up Linky Party hosted by Tara of Craftin Desert Divas!! Every other Monday will mark the beginning of a new semi-weekly linky party and you could win fabulous prizes!!


The theme this week is Anything Goes. The sponsors are Close to My Heart Consultant Robin Carroll with a $10 gift card, and our fabulous Linky Party Hostess Tara with a $15.00 Joann gift card. The more you link up, the better chance you have to win. Visit Craftin Desert Divas for all the rules and to play along :)


I am so addicted to my Dylusions sprays, stamps and stencils, they are all I want to work with anymore!! For this card, the paper is heavy-duty watercolor paper from Strathmore. It was spritzed with water and then Dylusions inks in Calypso Teal and Vibrant Turquoise. A Cosmic Swirls stencil from The Crafter's Workshop was placed over the paper and then sprayed with London Blue. The dots from a Dylusions Dotted Flowers stencil was placed over the top and spritzed with water for a ghosting effect. The stamps along the bottom and sides are from Dylusions' Further Around the Block stamp set, as are the hanging vines. They were stamped with Ranger Archival Ink. The blocks on the bottom and sides were colored in with a Tim Holtz waterpen filled with Cut Grass. The vines were colored in with TH waterpens filled with Funky Fuscia and Dirty Martini sprays. The black and white circle stamps are from Paper Wings Productions Art Textures stamp set. Some of the leaves were outlined with a Sakura white Gelly Roll Pen. Ranger Gold Pearl Liquid Pearl drops were added to some of the stems.


The dancing woman stencil is from The Crafter's Workshop. It was filled in with Wendy Vecchi Black Embossing Paste. The sentiment is from the Dylusions Right Word stamp set and adhered with Ranger Glue and Seal.

I am entering this in the following challenges:
  1.  Simon Says Stamp - Anything Goes Challenge
  2.  Sunday Funday #7 - Linky Party

Guest Designer photo CDD_GUEST-DES-Linky-Party_zps096caca2.gif

Thanks so much for stopping by!! Have a fabulo
us week :)

PRODUCTS USED:

Sunday, February 24, 2013

My First Dylusions Spray Project and WINNER!!

Happy Sunday!! I hope you are having a fabulous weekend!! I've been playing with my new Dylusions Ink Sprays and I am in love!! They are so much fun!! The colors are so bright and vibrant!! I hope you don't get sick of seeing me use them because I foresee lots of inky projects in the near future :)


I'll try, but I don't think I can even explain how I did the background because most of it was just playing around with the sprays and stencils and stamps :) I will also include a list at the bottom of all the supplies used.

The paper is watercolor paper from Strathmore. The Dylusions sprays used are Squeezed Orange, Pure Sunshine, Lemon Zest, Postbox Red, Cherry Pie, Bubblegum Pink, Funky Fuchsia, Dirty Martini, Fresh Lime, White Linen and London Blue. A Cosmic Swirls stencil from The Crafter's Workshop was placed over the paper and sprayed with Postbox Red. Another stencil from TCW, Numbers, was placed on the corners and spritzed with water for a ghosting effect. A Dylusions Dotted Flowers stencil was placed along the top corner and spritzed with London Blue. A waterbrush was then used to color in parts of the flowers with different colors of the sprays. A TCW Mini Art Is stencil was placed along the bottom and then covered with Wendy Vecchi Embossing Paste. The Dylusions Dotted Flowers stencil was placed back over the original one and a few of the dots were covered with the embossing paste. Two stamps from the Tim Holtz Ultimate Grunge set were stamped with Peacock Feathers and Fired Brick Distress Inks. White Linen Spray was then flicked on the background for subtle spots. Black Soot was sponged along the edges and then the paper was adhered to cardboard painted black.


Dylusions Pondering Petunia was stamped with Ranger Archival Ink in Jet Black and then colored with TH Distress Markers in Spiced Marmalade, Barn Door, Fired Brick, Tumbled Glass, Spun Sugar, Wild Honey, Dusty Concord, Mustard Seed, Bundled Sage, Antique Linen, Tattered Rose, Picket Fence and Faded Jeans. A Sakura Gelly Roll pen was used to outline Petunia and the flowers.


The sentiment, from TH's Just Thoughts stamp set, was stamped with Jet Black Archival Ink on TH Specialty Stamping Paper. The words were cut out and inked with Antique Linen and then Walnut Distress Ink along the sides. The arrows are from TH's The Journey stamp set. They were cut out, glued on and outlined with the white gelly roll pen.

I'm entering this in the following challenges:
  1. Simon Says Stamp - Use an Arrow
  2. Dl.Art Thankful Thursday - Linky Party
  3. Sunday Funday #6 - Linky Party
And now for the winner of A Lovely Blog Hop!! First, I have to apologize...I was supposed to announce the winner over a week ago. Time completely got away from me. So without further delay, the winner of the Fiskars Friendship stamps is:


and #56 is:


Congratulations, Missy!! Email your address to me at  indymermaid(at)gmail(dot)com and I will get them in the mail to you!!

Thanks so much for stopping by :)

PRODUCTS USED

LinkWithin

Related Posts Plugin for WordPress, Blogger...