H G Tut H C DT A F FB E P E Image Map

Thursday, January 30, 2014

More Stencil Projects :)

Happy Thursday, everyone!! Are you getting tired of my stencil projects yet?? I have a couple more to share with you today :) Before I get to them, I want to tell all my friends in the south that are now getting hammered with snow and ice that I am thinking of you and praying for your safety.


For this card, Tim Holtz Spun Sugar and Victorian Velvet Distress Inks were sponged through a Crafter's Workshop Harlequin stencil. The tag was cut with a TH Tiny Tabs & Tags die in vellum. The sentiment is from JustRite Stamps Grateful Hearts Vintage Labels 2 set. It was stamped with Versamark and heat embossed with white embossing powder. Pink gems from The Paper Studio and a clear sequin were added, along with pink and white twine.


For this card, Tim's Rays stencil was inked with Peacock Feathers Distress Ink. Then his Clockwork stencil was inked on top with Iced Spruce. Finally, Tim's Stripes stencil was inked with Peeled Paint and Mowed Grass, some of the stripes masked off. The sentiment is from Inspired by Stamping, using Donna Salazar's Mix'd Media ink in Jasmine on vellum. A Spellbinders Classic Heart was cut out and the panel was adhered with foam tape. A Dylusions Around The Edge stamp was stamped on the bottom panel in Iced Spruce and blue gems from The Paper Studio were added.

I am entering these in the following challenges:
  1. Simon Says Stamp Wednesday Challenge - Anything with Twine
  2. DL.Art - January Linky
  3. Just B Creative Crazy - January Linky
  4. 2 Creative Chicks - Anything Goes
Thanks so much for stopping by!! I only have one more stencil project to share with you later this week :)

Tuesday, January 28, 2014

Stenciled Day 4 - Part 3

And the final card from today using techniques from the online class Stenciled :)


I love the colors of this one. The stencil is a Crafter's Workshop Layered Butterflies stencil. It was inked with Tim Holtz Fired Brick, Spiced Marmalade, Squeezed Lemonade, Mowed Grass, Peacock Feathers and Salty Ocean Distress Inks. A Crafter's Workshop Flames stencil was then placed on top and the same colors were inked again. Thank You is a Die-Versions Compliments Everyday Die, you can find HERE. It was cut three times and glued together with Glossy Accents. It was then covered with Glossy Accents and sprinkled with Martha Stewart Carrara Marble glitter while it was still wet.

I am entering this in the following challenges:
  1. DL.Art - January Linky
  2. Just B Creative Crazy - January Linky
  3. 2 Creative Chicks - Anything Goes
Thanks so much for stopping by!! This was the last day of class, but I will have a few more cards using the stencil techniques later this week. Have a great day :)

Stenciled Day 4 - Part 2

And for the second card, I used another fun technique from Stenciled...embossing with stencils.


A piece of heavyweight cardstock from Canvas Corp was embossed with a Crafter's Workshop Cosmic Swirls stencil. The stencil was then placed back over the paper and it was inked with Tim Holtz Tattered Rose, Spiced Marmalade and Crushed Olive Distress Inks. A strip of washi tape was placed down the left side and then the embossed paper was placed on the base of the card. The bird is from Tim's Urban Tapestry stamp set. The edges of the paper were distressed with scissors. I was supposed to use a glassine bag behind the image but I couldn't find any in my very messy craft room, so I used a piece of TH Frosted Film. Unfortunately, it doesn't even show up in the picture. The sentiment is from Inspired By Stamping and it was heat embossed with white embossing powder and attached with Tim's Tiny Attacher. Silver sequins were then added.

I am entering this in the following challenges:
  1. DL.Art - January Linky
  2. Just B Creative Crazy - January Linky
  3. 2 Creative Chicks - Anything Goes
Card #3 follows...

Stenciled Day 4 - Part 1

Hi everyone and happy Tuesday!! I have a few more cards to share with you that are inspired by the online class Stenciled. There is a class gallery where you link your projects so I have to show each card in a separate post. Sorry about that and you don't have to leave a comment on each post!! So this is the first of three for today :)


For this card, I used colored pencils to fill in the stars in a random pattern from the Tim Holtz Stars stencil. Happy Birthday is from JustRite Stamps Grand Sentiments. The stamp is vertical, so I taped off each word to stamp them separately (did that make sense??!! It did in my head ;) The black paper is heavyweight cardstock from The Paper Studio. The edge was cut with a Spellbinders Classic Postage Stamp die. It was then embossed with a Sizzix Diamond embossing folder. The cream base is heavyweight cardstock from The Paper Studio.

I am entering this in the following challenges:
  1. DL.Art - January Linky
  2. Just B Creative Crazy - January Linky
  3. 2 Creative Chicks - Anything Goes
Project #2 follows...

Monday, January 27, 2014

Stenciled Day 3 - Part 2

And here is the second post from Stenciled Day 3. Please scroll down for the first post.


For this card, I started with a subtle spritz of Heidi Swapp Primrose Color Shine and then a spritz of Valentine Pink Glimmer Mist. Wendy Vecchi White Embossing Paste was then applied through a Crafter's Workshop Reversed Chicken Wire stencil. The leaves are a Dylusions Around the Edge stamp, stamped on vellum, cut out and then heat embossed with white embossing powder. It was attached with foam tape. The butterfly is a Spellbinders Grand Wonderful Wings die. It was sprayed with the Heidi Swapp Primrose Color Shine. When it dried, it was popped up with foam tape and pearls were added for the body. The sentiment is from My Creative Time's Many Greetings stamp set. It was heat embossed with white embossing powder.

I am entering this in the following challenges:
  1. DL.Art - January Linky
  2. Just B Creative Crazy - January Linky
  3. Little Scrap Pieces - Anything Goes
  4. 2 Creative Chicks - Anything Goes
Thanks so much for stopping by!! I hope to have more projects throughout the week using the stencil techniques!!

Stenciled Day 3 - Part 1

Happy Monday!! I hope you had a great weekend!! Wow, they just fly by, don't they??!! I have a couple more cards to share with you using techniques from the online card class Stenciled. This is the first one...the second one will follow in a separate post :)


I love the technique of this one. Translucent Embossing Paste from Wendy Vecchi was used through a Crafter's Workshop Flower Frenzy stencil. Once it dried, Tim Holtz Distress Inks were sponged on: Wild Honey, Spiced Marmalade, Fired Brick and Barn Door. I used a baby wipe to remove the color from the embossing paste. The flower is a Spellbinders Rose Creations die with a Bitty Blossoms inside. They were colored with Fired Brick and Barn Door and then spritzed with Valentine Pink Glimmer Mist for a sparkly shine. The sentiment and surround are from the TH Simple Sayings stamp set. The top banner is a Spellbinders Ornate Artisan Tags and Accents die. Love is a Die-Versions die from the Compliments Everyday set. You can purchase it HERE.

I am entering this in the following challenges:
  1. DL.Art - January Linky
  2. Just B Creative Crazy - January Linky
  3. 2 Creative Chicks - Anything Goes
Another card using stencils and embossing paste will follow...

Sunday, January 26, 2014

Stenciled Days 1 & 2

Happy Sunday, everyone!! I hope you are having a great weekend!! I have been taking an awesome online class called Stenciled. I have so many stencils that are just sitting in a drawer needing to be used so I thought this class would get me motivated to use them and it has. I am loving it :)


You all know how much I love layers and dimension. These cards are not my usual style...they are flat enough to mail without extra padding or postage!! This card was inspired from Day 1 - Inking and Masking. The paper is heavyweight cardstock from Canvas Corp. A section of the paper was masked to leave room for the sentiment. I used a Crafter's Workshop Chevron stencil and inked it with Tim Holtz Spiced Marmalade Distress Ink. I then flipped the stencil and inked it with TH Fired Brick. A circle stencil was used to add the dots of TH Picked Raspberry. Fired Brick was inked along the edges. The sentiment is from My Creative Time's Encouraging Quotes stamp set.


This card was inspired from Day 2 - Template Techniques. I had so much fun with this one!! The sentiment is from JustRite Stamps Live, Laugh, Love Stamp set. It was stamped in Versamark and then heat embossed with white embossing powder. A Tim Holtz Splatter Stencil was used to stamp the honeycomb stamp from Tim's Mixed Media stamp set in Spiced Marmalade. The Spiced Marmalade was then inked around the splatter stencil. I then rotated the stencil and stamped the circles from a Joann dollar bin stamp in Fired Brick, which was then inked through the splatter. The stencil was rotated one more time and inked with Peacock Feathers Distress Ink. Squeezed Lemonade and Fresh Mowed Grass Distress Inks were randomly added through the stencil. With a baby wipe, I wiped off the sentiment and then used a TH Pumice Stone Distress Marker to give the letters a shadow.

I am entering these in the following challenges:
  1. DL.Art - January Linky
  2. Just B Creative Crazy - January Linky
  3. 2 Creative Chicks - Anything Goes
Thanks so much for stopping by!!

Friday, January 24, 2014

Smile!!

Hi everyone and happy Friday!! I hope you have fun plans for the weekend!! Mine are to try and stay warm in these frigid temps. What is Mother Nature up to??!! It's my turn to share a project on the Die-Versions blog and believe it or not, I actually created a scrapbook layout :)


I used several Die-Versions dies for this page:

Brick Background
Downhill Font
Heart Doodles Wee Petites
Hexagon Background
Lacey Dots
Ring of Hearts
Smile Sweet Frame

This Way Wee Petites
Vines Corner Concepts

Please stop by the Die-Versions blog for all the details and the products I used to create this layout.

I am entering this in the following challenges:
  1. DL.Art - January Linky
  2. Just B Creative Crazy - January Linky
  3. 2 Creative Chicks - Anything Goes
Thanks so much for stopping by!! Have a wonderful weekend!!

Wednesday, January 22, 2014

DTC #67 - Valentine Treat Bags

Happy Wednesday, everyone!! I hope you are having a wonderful week!! It's time for another challenge at Decorate to Celebrate. The theme this week is Valentine Treat Bags or Birthday.


For my treat bag, I used Spellbinders Classic Scalloped Hearts and Classic Hearts. The top heart was popped up with foam tape. The paper is from My Mind's Eye Love Me stack. Love was cut with a Tim Holtz Love die. The handle was created with Die-Versions Lacey Dots die. The ribbon is from 3 Girl Jam.

I am entering this in the following challenges:
  1. DL.Art - January Linky
  2. Just B Creative Crazy - January Linky
  3. 2 Creative Chicks - Anything Goes
  4. 3 Girl Jam - Anything Goes with Ribbon
Now it's your turn!! Head on over to Decorate to Celebrate to see the amazing projects my talented design team sisters have created for today's challenge. Then link up your Valentine Treat Bags or Birthday project...I can't wait to see what you create :)

Monday, January 20, 2014

Happiness Never Decreases By Being Shared

Happy Monday, everyone and Happy Martin Luther King, Jr. day to all of my fellow Americans!! It's time for another fun challenge at Craftin Desert Divas!!


The theme this week is Shaped Cards. Our sponsors are:


The papers for this card are from Pink Paislee's Cottage Farms stack. The base and next two layers are Spellbinders Resplendant Rectangles. Each layer was popped up with foam tape.


The ribbon is from May Arts. The outer circle is a Spellbinders Picot Edge Circle die. A Spellbinders Standard Circles Large was inked with Tim Holtz Victorian Velvet Distress Ink and popped up with foam tape. I think the sentiment is from Artistic Outpost, but I'm not positive.


I am entering this in the following challenges:
  1. DL.Art - January Linky
  2. Just B Creative Crazy - January Linky
  3. 2 Creative Chicks - Anything Goes
Now it's your turn!! Head on over to Craftin Desert Divas to see the amazing projects my talented design team sisters have created for today's challenge, then Craft It Up & Link It Up!! I can't wait to see what you create :)

Friday, January 17, 2014

Die-Versions - A Memory That Lasts Forever

Hi everyone and happy Friday!! I hope you have fun plans for the weekend!! It's my turn to post on the Die-Versions blog today and I have a card to share with you using the Loopy Lace die, one of the new dies from the January 2014 "Back to Basics" release :)


Please head over to the Die-Versions blog for all the details on this card!!


You can watch a short video featuring the Loopy Lace die by clicking HERE.

I am entering this in the following challenges:
  1. Simon Says Stamp Monday Challenge - Anything Goes
  2. DL.Art - January Linky
  3. Just B Creative Crazy - January Linky
  4. Little Scrap Pieces - Anything Goes
  5. Funday Friday #32 - Anything Goes
  6. 2 Creative Chicks - Anything Goes
Thanks so much for stopping by!! Have a great weekend :)

Monday, January 13, 2014

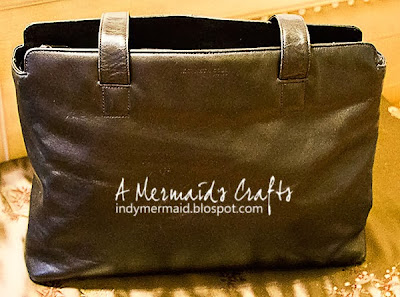
Homemade Camera Purse

Happy Monday everyone!! I hope you had a great weekend!! I have a craft project to share with you today, and it has nothing to do with paper :)

I have always enjoyed photography, but I never really learned all about my camera. One of my resolutions for this year is to learn as much as I can to take better pictures. I've signed up for a couple of courses and have been reading as many books as I can. I'm even shooting in Manual Mode with Back Button Focusing!! So, I have been taking my camera with me when I go places to practice. I have a Kata Backpack to carry my equipment, and it's nice, but a bit bulky. Plus, it isn't convenient to try to quickly switch a lens. So I started to look for a camera purse instead. My jaw dropped when I saw the prices on the ones I liked...over $300!! That's outrageous!! So, I dug through my closet, found this leather Kenneth Cole bag that I used to carry as a briefcase sometimes and thought it would make the perfect camera purse.


My Mom actually did most of the work on this...okay, all of it!! My contribution was cutting the foam and stuffing it into the pieces when she finished sewing them together :)


There are inserts that velcro to the sides so you can move or remove however you need.


There is plenty of room to hold the equipment I need, plus there are pockets on both sides that could carry an iPad or whatever, and a zippered inside compartment as well.


The entire padded area is one piece and can be removed. I took pictures along the way and thought about putting together a tutorial if anyone is interested. The entire project cost me less than $30 (not counting the price of the bag). I did have to order the 1/2 inch foam and the Paris material online. The bottom piece of foam is 1 inch thick and I purchased a small piece at Joann at 50% off. It works perfectly and I absolutely love it!!

I am entering this in the following challenge: 2 Creative Chicks - Anything Goes

Thanks for letting me share my...er, my Mom's project with you today :) 

Friday, January 10, 2014

Die-Versions - Just Because!!

Happy Friday everyone!! I hope you had a great week!! It was a cold one here, but temps are supposed to climb into the 40's this weekend...heat wave!! It's my turn to share a project on the Die-Versions blog today :)


Please head over to the Die-Versions blog for all the details on the dies and products I used. Have you visited the blog yet?? You could win a $10 gift certificate to the Die-Versions store!! There will be 20 winners - what awesome odds!! All you have to do for a chance is:
  1. Leave a comment on the original DV Blog post HERE
  2. Become a follower of our blog HERE
  3. Like our Facebook page HERE
The lucky winners will be announced on Saturday, January 12!! Good Luck!!

I am entering this in the following challenges:
  1. DL.Art - January Linky
  2. Just B Creative Crazy - January Linky
  3. Little Scrap Pieces - Anything Goes
  4. 3 Girl Jam - Anything Goes with Ribbon (Aqua Crush)
  5. 2 Creative Chicks - Anything Goes

Wednesday, January 8, 2014

New Die-Versions Blog and GIVEAWAY WINNER!!

For my Decorate to Celebrate Post, click HERE


Hi everyone!! Die-Versions has a brand new blog and a brand new design team!! Come join us in our new blog for a chance to win some free goodies!!

We will be giving away 20 gift certificates to our store valued at $10 each!!

Participating is easy, simply:

We will announce the lucky winners Sunday, Jan. 12. GOOD LUCK!!

And now I have a winner to announce from my Die-Versions giveaway!! First of all, I want to sincerely thank you all so much for your support. It means so much to me. I have the most amazing friends/followers and I am so thankful for each and every one of you :)

I am sad there can only be one winner, but I will definitely have more Die-Versions giveaways in the future. I am in love with these dies and I know you will be, too!! Without further ado, Random.org selected as the winner #35, and that is..............


Congratulations, Tammy!! I'll send you and email or you can email your address to me at: indymermaid(at)gmail(dot)com and I'll get the dies in the mail to you!!

Thanks again for your support!! Have a great day :)

Decorate to Celebrate #66 - Snowman/Snowflake or Birthday

Happy Wednesday everyone!! I hope you are having a great week!! For those of you that are feeling the effects of the bitter winter storm, my thoughts and prayers are with you. Gah, it's cold, isn't it?? The temps are so brutal, it literally hurts to go outside. Perfect excuse to say indoors and craft :)

It's time for another fun challenge at Decorate to Celebrate!! We are changing things up a bit in 2014...we will have a theme that the design team follows, and you can either link up a project with the theme or submit a birthday party project - it's your choice!! Also, we have a new sponsor!! Our fabulous design team member Norma of Pink Bling Crafter, an Independent Stampin Up! Demonstrator, will be sponsoring the even numbered challenges!! How exciting!! You can still win an awesome mini from the amazing Rhonda of Scrap Happens With Rhonda on all the odd numbered challenges :)

Our theme this week for Challenge #66 is Snowman/Snowflake or Birthday!! Let's celebrate EVERYTHING WONDERFUL about SNOWY NIGHTS, SNOWBALL FIGHTS, FROSTY the SNOWMAN or BIRTHDAYS  with your table decorations, party banners, pennants, yard signs, cupcakes, party favors and more!!  :)


For my Snowman party, I created snowman snacks!! I saw different versions of these on Pinterest and mine didn't come out anything like those :/  Hey, it was really just an excuse to buy some of the powdered donuts ;) M&M's were added and dark chocolate drops for the eyes. Chocolate sprinkles were used for the mouths. For the marshmallows, orange Tic Tacs were used for the nose. The hats were dipped in chocolate and then put into the freezer.

I am entering these in the following challenges:
  1. Craft It Up & Link It Up - Winter
  2. DL.Art - January Linky
  3. Just B Creative Crazy - January Linky
Now it's your turn!! Head on over to Decorate to Celebrate to see the amazing projects my talented design team sisters have created for today's challenge. Then link up your Snowman/Snowflake or Birthday projects...I can't wait to see what you create :)

Monday, January 6, 2014

Craft It Up & Link It Up #22 - Winter

Happy Monday!! I hope you had a wonderful weekend!! It's time for another fun challenge at Craftin' Desert Divas!! This week our theme is Winter...a good one since there are inches of snow on the ground and the temps are dipping into the negatives :( I hope you are all faring well against this brutal winter storm.

Our sponsors for this challenge are KaDoodle Bug Designs with $15 gift certificate, CardzTv
 with a stamp set, and Miriam's with $5 Credit (not on ATG or shipping).


My card was created with heavyweight cardstock from Canvas Corp. Spellbinders Card Creators Dies A were used to cut the paper. It was then embossed with a Cuttlebug snowflake embossing folder and gems from Recollections were used for the center of the snowflakes. Winter Wishes are K Andrew Designs stamps.


The stamp is a Hero Arts Overexposed Tree, stamped in Tumbled Glass Distress Ink on a Spellbinders Card Creators B die. I just love tree stamps, and this one is so awesome!! It was popped up with foam tape for dimension.


I am entering this in the following challenges:
  1. Simon Says Stamp Monday Challenge - Blues
  2. DL.Art - January Linky
  3. Just B Creative Crazy - December Linky
  4. Little Scrap Pieces - Anything Goes
Now it's your turn!! Head on over to Craftin Desert Divas to see the amazing projects my talented design team sisters have created for today's challenge. Then link up your Winter project...I can't wait to see what you create :)

Friday, January 3, 2014

Die-Versions - New Year's Celebration!!

Happy 2014, everyone!! I hope the new year brings you all you hope and wish for!! I hope this year doesn't fly by as fast as the last, but I have a feeling it will :)


I am so excited to post my first project for the Die-Versions Design Team!! It's a New Year's Celebration!! Please stop by the Die-Versions blog for all the details on my project including the dies used!!

I am entering it into the following challenges:
  1. Simon Says Stamp Wednesday Challenge - Something New (New DT)
  2. DL.Art - January Linky
  3. Just B Creative Crazy - December Linky
  4. Funday Friday #31 - Happy New Year
  5. Little Scrap Pieces - Anything Goes
Thanks so much for stopping by!! I hope you have a wonderful first week of 2014!!

LinkWithin

Related Posts Plugin for WordPress, Blogger...