H G Tut H C DT A F FB E P E Image Map
Showing posts with label TH Distress Ink. Show all posts

Tuesday, April 17, 2018

Merry and Bright for Sparkle N Sprinkle

Hello, everyone!! It's my turn to post on the Sparkle N Sprinkle blog and I have a couple of cards to share with you featuring the New Christmas Baubles stamp set.


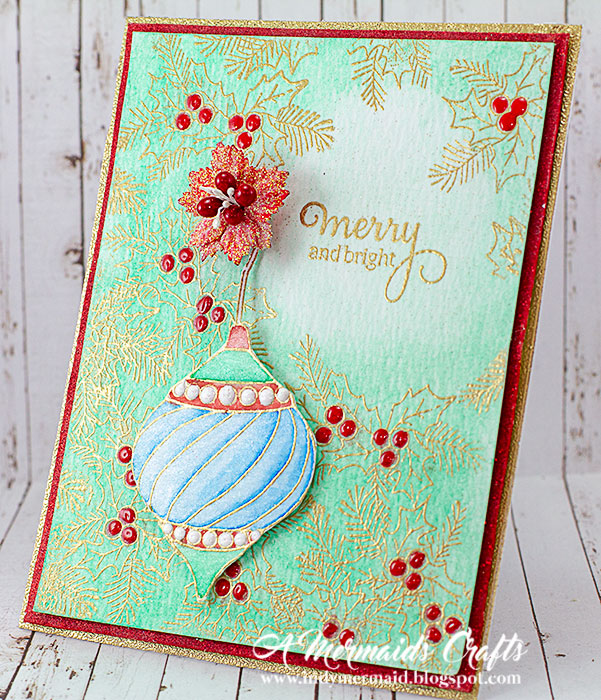
On the base of the card, I applied Tear-ific Tape ½” to the edges and then heat embossed it with Gold Detail embossing powder. For the next layer, I again covered it with Tear-ific Tape ½” and then covered it with Gypsy Red glitter.


For the next layer, after using a Anti Static Bag over the surface of the cardstock, I used a Tim Holtz Stamp Platform to stamp the holly image from the Christmas Baubles set several times with Versamark Embossing Ink Pad and then heat embossed it with Gold Detail embossing powder. I also embossed the sentiment with Gold Detail embossing powder. I used Tim Holtz Distress Ink to highlight the embossing.


The berries are Nuvo Crystal Drops Red Berry.


For the poinsettia, I covered a Wild Orchid Crafts poinsettia with Brushable Glue and then covered it with Starfire glitter. Isn't the sparkle amazing??!!


The ornament was stamped with a Tim Holtz Stamp Platform with a Versamark Embossing Ink Pad and then heat embossed it with Gold Detail. It was then colored with watercolors and once dry, I used a Nuvo Aqua Shimmer Glitter Gloss Pen to give it shimmer. I then used Nuvo Crystal Drops SimplyWhite for dimension, and while it was wet, I sprinkled it with Cloud Nine glitter for some added sparkle. Using Tonic Spring-Cut Fine Tip Detail Scissors 6.5”, I cut the ornament out and popped it up with foam tape for dimension.


SNS Products Used

Stamps: Christmas Baubles 00-891P6

Glitter: Cloud Nine (2000); Gypsy Red (2005); Starfire (1017)

Embossing Powder: Gold Detail (EP168)

Adhesive: Tear-ific Tape ½” (SAT04); Brushable Glue (54)

Other: Tim Holtz Stamp Platform (1707E); Nuvo Crystal Drops SimplyWhite (651N); Nuvo Crystal Drops Red Berry (667N); Nuvo Aqua Shimmer Glitter Gloss Pen (888N); Versamark Embossing Ink Pad (VM001); Anti Static Bag (99512); Tonic Spring-Cut Fine Tip Detail Scissors 6.5” (404) Wild Orchid Crafts Flowers; Watercolor Paints

Be sure to leave a comment both here and then head on over to the SNS Blog and leave a comment there as well for your chance to win a $20 gift card to SNS!! One lucky winner will be chosen from one of the Designers' posts on the last day of each month!! There will be new projects on the SNS Blog every day to increase your chances of winning!!

Thanks so much for stopping by!! Have a great day :)

Monday, November 6, 2017

Poinsettia Christmas Tree for Wild Orchid Crafts

Hello, everyone and happy Monday!! I hope you had a wonderful weekend!! It's my turn to post on the Wild Orchid Crafts Blog and I'd love for you to stop by if you have time :) Today, I'm sharing a Christmas project with you featuring products found in the Wild Orchid Crafts store.


I picked up a paper mache cone from Hobby Lobby for the base of the tree. I painted it white and then covered it with cheesecloth. Next, I covered it with poinsettias created with Ivory Flower Making Foam.


I love making these flowers!! I decided to leave the natural Ivory color and just ink the bottom layer with Peeled Paint Distress Ink for the leaves. I used a combination of White Double Head Pearl Stamens and Small White Double Head Pearl Stamens.


And here it is all it up :)


Wild Orchid Crafts Products Used:


Thanks so much for stopping by!!
Have a great day :)

Tuesday, November 29, 2016

Tim Holtz 12 Tags of 2016 - November

Hi everyone and happy Tuesday!! I have had a hard time getting in my craft room this month...hence the last minute entry into Tim's 12 Tags of 2016!! I've entered every month so far so I couldn't miss this one!! And I am short of time today, so this will be a quick post :)


My tag is quite a bit different from Tim's this month...I used products I had on hand. For the Remnant Rub Resist, I started with Remnant Rubs and then Distress Inks in Spiced Marmalade, Squeezed Lemonade, Ripe Persimmon, Mowed Lawn and Mermaid Lagoon. The edges were inked with Gathered Twigs. For the Dimensional Coloring, I used the butterflies from his French Flight Framelets and colored them with Distress Markers and a TH Waterbrush. The metal leaves are from his Idea-ology Adornments Nature set.


I am entering this in Tim's 12 Tags of 2016 Challenge.


Thanks so much for stopping by!! Have a great day :)

Wednesday, November 16, 2016

Scrapy Land Challenge #54 - Give Thanks

Happy Wednesday!! I hope you are having a wonderful week!! It's time for a new challenge at Scrapy Land and the theme this week is Give Thanks Plus a brand of die that Scrapy Land carries...there are over 40 to choose from!! You could win a $15 gift certificate to shop at Scrapy Land .


I feel bad, but I can't give you very specific instructions on how I made these cards. I worked ahead before I left on vacation last month and as I sit here trying to do the write-up, I can't remember all the products that I used!! I will try though :) For the background, I created a mask of the moon with a Memory Box Stitched Circle die. I then added layers of Distress Ink (not sure of the colors...I know there was Squeezed Lemonade, Ripe Persimmon, Spiced Marmalade). I then flicked drops of water onto the ink. The tree line stamp is from Stampin' Up.


Along the side, a Poppystamps Leafy Sprig Border was layered over a Sizzix Tim Holtz Mixed Media Thinlet die. The gorgeous ribbon is from DL.ART. A Memory Box Circle Die was used for the sentiment, and leaves from Impression Obsession Small Leaf set were added.


The button on the ribbon is a Poppystamps Stitched Button die. Burlap was added behind the scene for added texture.


I totally can't remember at all how I created the rough bark texture on the Sizzix Tim Holtz Birch Tree Thinlet. I wish I could. I actually planned on doing a tutorial and it irritates me that I can't remember the steps. I know there was DecoArt Crackle Paste involved, but the rest I just can't recall.


The deer are Impression Obsession Deer Trio dies. They were popped up with foam tape for dimension.

Scrapy Land Products Used

I am entering this in the following challenge:

1) Simon Says Stamp Monday Challenge - Give Thanks


Now it's your turn!! Head on over to Scrapy Land to see the amazing projects my design team sisters have created for today's challenge!! Then link up your Give Thanks project using a brand of die that Scrapy Land carries!! I can't wait to see what you create :)

Thursday, September 22, 2016

DL.ART Thankful Thursday #189 - Fall

{This is a scheduled post} Happy Thursday and happy first day of fall to all my northern hemisphere friends...or happy spring to those in the southern hemisphere!! I am leaving today for two weeks so I will not be able to visit you until I return. It's time for a new Thankful Thursday challenge at DL.ART and the theme this week is fitting...Fall!! If you use the code l01210, Diana will give you 10% off your order at DL.ART :)


For my fall cards, I used papers from Maja Designs Walking in the Forest stack. The edges were distressed with a Zutter DIA and inked with Tim Holtz Gathered Twigs Distress Ink.


For the focal point on my cards, I used a wheelbarrow die from My Craft Spot (sadly, no longer in business). I popped it up with foam tape and added leaves from My Creative Time. The leaves were crumpled and then inked to give them a worn look.


The banner is a My Creative Time Stitched Banner die. The sentiment is from My Craft Spot. This gorgeous crinkle ribbon is Caribbean Coral ~ Tropical Summer Bundle.


And this beautiful ribbon is Green ~ The Rainbow Bundle.


Thanks so much for stopping by!! I will catch up with all of you when I return!! Big hugs :)

Saturday, July 30, 2016

Waving Hello!!

Happy Saturday!! I hope you are having a wonderful last weekend in July!! How is that even possible?? Good grief, the days are flying by so fast :/ I have a fun summery card to share with you today :)


Isn't the mermaid adorable??!! My dear, sweet friend Dee of Dee B's sent me the most adorable card:


It's so sweet!! I just love it!! She also sent me these awesome Lawn Fawn stamps:


I had to make a card with them so I CASE'd Dee's fabulous card!! Thank you again, Dee!! I love them so much!! I wanted my mermaid to move like her card, so I purchased the Lawn Fawn Slide On Over dies.


The clouds were created with a Poppystamps Puffy Cloud Border die and Tumbled Glass Distress Ink. The adorable Plane With Banner is an Impression Obsession die. The sailboat and seagulls are Die-Versions Sail Away stamps and dies.


The ocean was created with Salty Ocean and Mermaid Lagoon Distress Ink and a Tattered Lace Ride the Waves die. The seaweed, fishies, mermaid and dolphin are from Lawn Fawn. I learned the hard way that I couldn't have too much dimension or the mermaid and dolphin wouldn't slide easily.


Here you can kinda see how she moves. I should've taken a short video to show you. So fun to play with :) Thanks so much for stopping by!! Have a wonderful weekend :)

Sunday, June 5, 2016

Anything But Cute June Challenge - The Birds and the Bees

Happy Sunday!! I hope you are having a wonderful weekend!! It's time for a new challenge at Anything But Cute!! The sweet and fabulous Niki of Pawsitively Creative is our hostess and she's chosen the theme "The Birds and the Bees". Here's what she has to say about the challenge:


With the lovely warm weather in my neck of the woods, I am seeing so many wonderful birds and bees, so I would love to see those in your mixed media makes! Pull out those bird stamps, think of feathers and maybe some honeycomb. Or you could even go for a non-traditional interpretation like a family crest that has a bird emblem on it. The sky is the limit but NO BUTTERFLIES please!


When I sat down to work on my project, I was totally positive I was going to create a card with birds...imagine my surprise when it ended up being all about bees instead :)


I started with a background created with various colors of brushos. I then used Liquitex Texture Paste through a honeycomb stencil...okay, it's actually a reverse chicken wire stencil, but I thought it looked like a honeycomb :)


I then used a TCW Chicken Wire stencil with DecoArt Crackle Paste for the strip of paper behind the sentiment. I used the same stencil with with Squeezed Lemonade and Mustard Seed Distress Inks on the label.


The bees are a Spellbinders die. I masked off the tail and inked it with Squeezed Lemonade Distrss Ink and then Mustard Seed towards the end of the wings for a subtle ombre effect. I then masked the body and Inked the tail with Black Soot Distress Ink.


The bee was then covered with DecoArt Crackle Glaze. I cut a black base layer and attached them with foam tape for added dimension.


There are several layers to the card. The edges of the papers were distressed with a Zutter DIA.


I had to give a nod to our feathered friends by adding a feather among the Wild Orchid Crafts flowers and ribbon from DL.ART.


Now it's your turn!! Head on over to Anything But Cute to see the amazing projects my design team sisters have created for today's challenge...I guarantee they will inspire you!! Then link up your mixed media Birds and Bees project (remember, no butterflies and no cute images)!! I can't wait to see what you create :)

Sunday, May 15, 2016

Tim Holtz 12 Tags 0f 2016 - May

Happy Sunday!! I hope you are having a wonderful weekend!! It's a chilly one here...windy with temps in the low 40's. The month's half over and I already have my tag done for Tim's 12 Tags challenge!!


I followed Tim's instructions HERE. I had a few substitutions but I tried to stick close to Tim's tag. I don't have his Tiny Tattered Florals so I used the Tattered Florals die. The face stamp is from his Nature's Walk set.


The stems stamp is from his Nature's Element stamp set. I used texture paste through Tim's Speckle stencil on the bottom of the tag.


I am entering this in Tim's 12 Tags of 2016 Challenge. I have a few more bird pictures to share with you. It's been raining on and off for days, so I haven't been able to get outside to take pictures. These are more shot through the windows. So, without further ado, bird pics part 2:


This beautiful bird is a Red Headed Woodpecker. There are several different woodpeckers here but this one is the prettiest in my opinion.


This is an American Goldfinch. Such gorgeous yellow color!


My little Chickadee :)


This is a Brown Thrasher. It's hard to see his yellow eye in the photo so...


I blew up the photo. It's not sharp at all but you can see his eerie yellow eye.


And in this tree is an American Cat Bird...no wait, it's just a cat...my sweet baby Calypso :)


Here she is after taking a drink from the bird bath...maybe she thinks she's a bird??!! Thanks so much for stopping by!! Have a great day :)

LinkWithin

Related Posts Plugin for WordPress, Blogger...