

Hi everyone and happy Saturday!! I am taking over my sweet friend Jo's blog today!! I was so honored when she asked me to guest design and couldn't wait to create a project to share with you. I'd love for you to hop on over to Jo's Scrap Shack and say hi :)

Last week marked the first day of spring - yay!! So I've created a couple of easel box cards to celebrate the new season :) There are tons of tutorials on how to make these, but I just kind of winged it and created my own. I took a few pictures and threw together a quick tutorial. I wanted my card to be 5x5 and the depth of the box at 1", so using those measurements, you will need:
Box Base

1) Start by scoring the 5 x 11 cardstock at 1 7/8", 3", 8" and 9 1/8". I added an eighth of an inch to each side so that the box would slide easily. Also, the reason I used 8 1/2 x 11 cardstock is because I have it in heavyweight...I don't have any 12 x 12 that I thought would be heavy enough to use as the base. I used Neenah Solar White Cardstock in 110lb. weight.

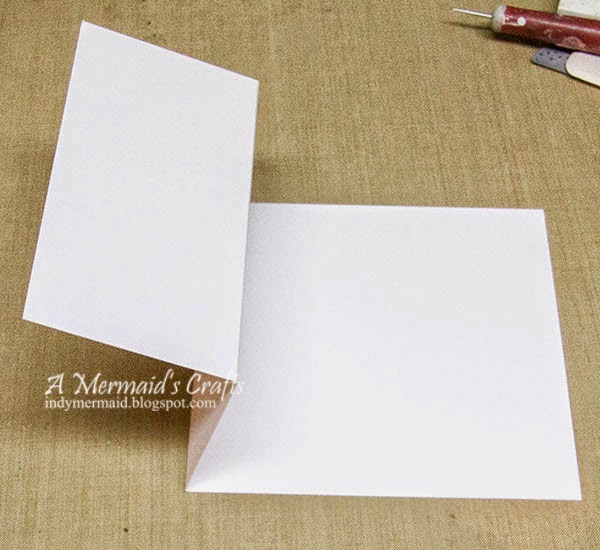
2) Fold at the score lines. It will look like the picture above. Apply glue and adhere the 5 x 5 piece of cardstock to the base.

3) It will look like this when you are done. This will be the sleeve for the box.

4) Score the 7 x cardstock at 1" on all four sides.

5) Fold the score lines. Cut the lines pictured above. I always make the cuts a slight triangle so that the sides match up better when glued together.

6) Fold the end pieces up and adhere glue.

7) Glue the end pieces so that it forms a box.

8) The box will now slide easily into the sleeve.

9) To decorate the inside box, I used two pieces of 1 x 6 patterned paper and 2 of 1 x 5.

10) I scored the 1 x 6 pieces at 1/2" from each end and then wrapped them around each end of the box to add a little more strength to the corners of the box. I then adhered the 1 x 5 pieces on the other two sides. I did the same thing on the inside and then added the 5 x 5 patterned paper to the bottom.

Easel Card

1) Score the 5 x 10 cardstock at 2 1/2" and 5".
2) Fold as shown with a mountain fold at 2 1/2" and valley fold at 5".

3) Adhere the 5" end to the top of the box. On the 2 1/2" end, apply adhesive and adhere the 5 x 5 cardstock.

4) Your easel box will now look like this. Time to decorate!!

The papers for both of my boxes are from Prima. The edged were distressed with a Zutter DIA. The flowers are from Wild Orchid Crafts.

I used heavy-duty burlap for the handle, and several dies for each box.

They are now ready to fill and give as gifts!! I want to sincerely thank Jo for having me guest design today!! Thanks for stopping by and have a wonderful weekend :)
Last week marked the first day of spring - yay!! So I've created a couple of easel box cards to celebrate the new season :) There are tons of tutorials on how to make these, but I just kind of winged it and created my own. I took a few pictures and threw together a quick tutorial. I wanted my card to be 5x5 and the depth of the box at 1", so using those measurements, you will need:
Box Base
- 1 - 5 x 11 cardstock
- 1 - 5 x 5 cardstock
- 1 - 7 x 7 cardstock
- 2 - 1 x 6 strips of patterned paper
- 2 - 1 x 5 strips of patterned paper
- 1 - 5 x 5 piece of patterned paper for inside of box (may have to trim slightly)
1) Start by scoring the 5 x 11 cardstock at 1 7/8", 3", 8" and 9 1/8". I added an eighth of an inch to each side so that the box would slide easily. Also, the reason I used 8 1/2 x 11 cardstock is because I have it in heavyweight...I don't have any 12 x 12 that I thought would be heavy enough to use as the base. I used Neenah Solar White Cardstock in 110lb. weight.
2) Fold at the score lines. It will look like the picture above. Apply glue and adhere the 5 x 5 piece of cardstock to the base.
3) It will look like this when you are done. This will be the sleeve for the box.
4) Score the 7 x cardstock at 1" on all four sides.
5) Fold the score lines. Cut the lines pictured above. I always make the cuts a slight triangle so that the sides match up better when glued together.
6) Fold the end pieces up and adhere glue.
7) Glue the end pieces so that it forms a box.
8) The box will now slide easily into the sleeve.
9) To decorate the inside box, I used two pieces of 1 x 6 patterned paper and 2 of 1 x 5.
10) I scored the 1 x 6 pieces at 1/2" from each end and then wrapped them around each end of the box to add a little more strength to the corners of the box. I then adhered the 1 x 5 pieces on the other two sides. I did the same thing on the inside and then added the 5 x 5 patterned paper to the bottom.
Easel Card
- 1 5 x 5 cardstock
- 1 5 x 10 cardstock
- Embellishments
1) Score the 5 x 10 cardstock at 2 1/2" and 5".
2) Fold as shown with a mountain fold at 2 1/2" and valley fold at 5".
3) Adhere the 5" end to the top of the box. On the 2 1/2" end, apply adhesive and adhere the 5 x 5 cardstock.
4) Your easel box will now look like this. Time to decorate!!
The papers for both of my boxes are from Prima. The edged were distressed with a Zutter DIA. The flowers are from Wild Orchid Crafts.
I used heavy-duty burlap for the handle, and several dies for each box.
They are now ready to fill and give as gifts!! I want to sincerely thank Jo for having me guest design today!! Thanks for stopping by and have a wonderful weekend :)
60 comments:
Gorgeous, gorgeous easel cards, Lisa! Just love the way you have embellished it and all the beautiful papers and colors you have used. TFS the step by step tutorial :)
Lisa these drawer boxes are stunning. Such wonderful gift ideas which can be filled with so many kind of goodies.
Hugs Desíre {Doing Life}
Super fun tutorial Lisa, you made it look so easy, I might even try it. CONGRATS ON YOUR Guest Design spot. You did a great job. Have a blessed and beautiful day.
WOW!!! These are stunning! I'm so glad you shared how you made them too. I definitely want to try one.
WOW! These sure are gorgeous!! You're so creative!
Wow absolutely beautiful - love the flowers and all the embellies and thanks for sharing the tutorial great job as always and have a fabulous weekend!!!
Lisa, these are absolutely beautiful. The one on the right is my fav. Great job and thanks for sharing the tutorial.
Oh my gosh, Lisa, these are stunning! and what a great tutorial, thank you.
Hugs,
Larelyn
So BEAUTIFUL!
STUNNING Lisa! Terrific tutorial too! Have a lovely weekend! Hazel xx
Wow, Lisa, you've done it again! These are fabulous! And thank you for the photo tutorial! Love, love, love how these turned out! The flowers and die cuts look amazing! Anyone who receives these from you will be so happy! Enjoy your weekend!
Oh my goodness...words fail me! These are just stunning my sweet friend. What a wonderful idea. I love the beautiful papers you used to create these stunners and the flowers are amazing. Your eye for detail is spot on as always....I absolutely love these!
Such a beautiful box! Love all of those gorgeous flowers! Thanks so much for the tutorial! Hope you have a wonderful weekend!
These are both so beautiful!! Thank you for the tutorial! It doesn't seem as hard as the finished project looks. I love how you decorated both of them and the flowers do feel like Spring! I hope you have a wonderful day :)
Hi Lisa what wonderful projects I love them and the papers you have used are gorgeous.
And the pretty flowers are lovely. Thank you for your support on my blog.
I'm sorry nice not been returning commenting as my laptop as gone for repair and I'm having to use my phone which is not good on the eyes.
Debs xxx
Your creations always just amaze me and these are no exception! Wow! So beautiful.
Lynn
Love all the fun colors on each one... These are also fun to make and they make cute gifts too!
Great job on the tut to Lisa! Enjoy your crafty weekend!
Hi Lisa,
I commented over at Jo's but I wanted to come over here too. I bookmarked this tutorial, I am going to make a beach themed one this summer! So cute!
Hugs,
Louie's Mom
Wow!! What a fabulous design and so beautiful embellishments! Love this colourful project!! Great work!
Wow, how beautiful Lisa! The papers are simply stunning and the flowers are gorgeous! Your tutorial is awesome and if I ever have some spare time, I would love to make one! I have been so busy since little Lacy has been here, lol! I have been helping in one way or another doing something with the little ones. Last night Arya wanted to spend the night, how could I say no? Hahah!
Hope you are enjoying your wknd! It is a little cool here but the sun is out! I am hoping to get some much needed yard work done tomorrow and dig into my spring cleaning! Can you believe it is almost April?! Yikes!
Sherrie k
These are so beautiful I love the design and all the wonderful flowers, thank you for the tutorial, hopefully when I get some time I will have a go
Kevin xx
Lisa, these are amazing... the first I've seen, and what a fabulous job you've done!!! You're so very gifted, dear girl!
Have a great weekend!
Lisa, what a fabulous project. So beautiful. A terrific way to celebrate spring. Thanks for the tutorial, also.
OMGOSH! Look at you Guest Designing ALL over the place! HA! Well Deserved! :) These look Amazing Lisa! I LOVE the Tutorial you did and They are just so beautiful! LOVE those flowers you added and What a Cool way to Kick off Spring with these box cards... LOVE them!!! :)
Have a great weekend! :)
Theresa
These are so so beautiful.
And so fun to add a little gift, gift card or yummy chocolate in.
Thank you so much for the tutorial as well :)
Lisa this is so stunning! I love all the attention to detail and all the dies. Thanks for the tutorial too. Congrats on your GDT spot. Hugs, Robin
Oh my sweet friend, these are just so beautiful! Wow, they are singing a spring tune! These flowers are gorgeous and this box card is really neat, thanks for sharing the tutorial.
I just can't believe its the end of March, I've been so busy I feel like I can't catch up. We had a small break in soccer but that's over and we've been doing a science project all week. At least we've had gorgeous weather, so I can't complain. Hope you are getting some decent weather or maybe some soon to come :)
Have a wonderful weekend!
Shelly
Oh Lisa these boxes and easel card are fantastic!!! I LOVE your tutorial and easy follow along instructions. Thanks to you, I will now be able to make these too! Your papers are gorgeous and I love how beautifully you decorated these .... the recipient is going to just swoon over these!! Thank you so so much my sweet friend for being my guest designer! It truly meant the world to me! Hope you have a fantastic and crafty weekend!!!
Hugs,
JO
xoxox
A brilliantly designed creation with fantastic colours Lisa, your tutorial is very easy to follow as well....Thanks for always popping in my blog too.xxx
{The Journey is the Start – my personal blog}
Oh my LIsa! These are stunning! Love your Easel card box!
Congrats on your guest designer spot Lisa! Your box/cards are just beautiful Lisa! I love how you decorated them, of course I always love how you use flowers. I'm just not that talented to arrange flowers to where they look right. lol Love the papers and dies you used as well. Thanks for the tutorial Lisa! Hugs, Brenda
WOW..these are so gorgeous I don't even know what to say!!! Stunning is a good start...wowzers my friend you have once again knocked it out of the park!! Congrats on your guest designing, too...you go girl!!!! Hope you are having a marvelous weekend!!
Lisa these box cards are absolutely gorgeous! I love all beautiful details you incorporated into these, each one is a masterpiece!
Lisa , these are fantastic !!!! Beautiful design and details !!!! Thank tou so much for the wonderful tutorial !!!!! Have a wonderful and blessed day !!
Hugs,
Mayra
Absolutely stunning Lisa and fabulous tutorial!
Stunning little drawer boxes my friend. Love the design, the papers and those fabulous flowers. Thanks for the tutorial.
Have a creative day.
Hugs Nana
♥ My Crafting Channel ♥
♥ Nana's Rag Quilts ♥
♥ 2 Creative Chicks ♥
♥ Silhouette Challenges ♥
Wonderful projects for your GD spot...and these are just awesome. Of course you did your usual magic with the pretty papers & florals, which is always so impressive. But it's over the top with the fab easel box cards, and that you not only created your own measurements, but took the time to photo & share a terrific tutorial with bloggers. I'd say this was a very brilliant fulfillment for your GD assignment! It's fantastic. TFS & Hugs
A huge WOW on this my friend!!! I ADORE all the beautiful flowers!!!!They are both Stunning & GORGEOUS! I love the beautiful spring paper that you used. TFS the tutorial!!
Congrats on your GDS! Awesome job my friend!!
Have a wonderful day,
M'
Crafting With Creative M
I love your cards, thanks for the tutorial, I made a few of thes this winter, I love them. But yours are gorgeous, love the flowers. Have a great day,
cathyplus5
Gorgeous! Thanks for sharing the tutorial! Again, your flowers are amazing! Hoping you have a great week!
Debbie
What a great project Lisa! Great tutorial!
What a BEAUTIFUL project!!! TFS the great turorial!! Have a great day.
Gerda
One word .......WOW! Thanks for sharing the tutorial too :)
These are just beautiful, I especially love the one with the dancing couple!!
Oh Lisa, these are just beautiful. I love them both and the decorations are truly gorgeous. Plus wonderful instructions for us to make our own. I love how you used burlap for the handles. How clever.
Oh Lisa, these are just beautiful. I love them both and the decorations are truly gorgeous. Plus wonderful instructions for us to make our own. I love how you used burlap for the handles. How clever.
Oh Lisa, your boxes are just gorgeous! Your tutorial is great and so detailed. I may have to try one myself!
Pam
scrap-n-sewgranny.blogspot.com
Woww!! Gorgeous..love the card and thanks for the tutorial.. :D
Wow, these are all so fabulous! Love them all. thanks for the tutorial, I'll be back to make one of my own. BTW, I only get a chance to go back and comment about once every couple weeks, I work A LOT and so I think everyone will understand if you cannot get back to everyone all the time. :)
Thank you for the detailed pictorial. Beautiful boxes!
Oh wow. These are beautiful! Thanks for sharing the tutorial....I might attempt this.:)
Oh my these are stunning! Fabulous papers and embellishments. Thanks for the tutorial and congrats on your GDT.
Stunning Lisa - great tutorial :)
Oh my goodness! This is amazing! thank you for sharing the great tutorial!
WOW! those are amazing!!! If i wasn't so lazy, i'd try to make one; they're so cool! I'll just admire yours ;) BEAUTIFUL!
flowers and shabby style with pretty floral pattern papers...a truly winning combo! Absolutely gorgeous gift box!
Oh WOW! these is such a awesome project and tutorial my friend! Beautiful...
Hugs,
Norma
What a creative and fun project!!! Thank you for the tutorial!
Gorgeous.
Thank you for tutorial
These are just gorgeous my friend. Thank you for the tutorial, I am going to PIN this! By the way, I saw that you are a winner on Try It On Tuesday, congrats!
Post a Comment