H G Tut H C DT A F FB E P E Image Map
Showing posts with label Guest Designer. Show all posts

Thursday, March 2, 2017

Scrapping4fun Challenges Guest Designer

Happy Thursday!! I'm so excited to be a guest designer for Scrapping4fun Challenges this week. The theme for Challenge #85 is Boy, For Dad, Masculine.


Masculine cards are very hard for me. I struggle if I can't use flowers and ribbons and bling. So, for my cards, I created mixed media Father's Day and birthday cards.


I started with heavyweight cardstock and covered it with sand texture paste for a grainy texture. Once it dried, I covered it with black gesso. Then I used Finnabair's Rust Paste set to create the rusted look.


The gears are a Memory Box die and I used the same technique as the background paper: sand texture paste, black gesso and Finnabair Rust Paste. 


I'm totally addicted to this stuff!! I want to rust everything!!


Happy is a My Creative Time die, embossed with copper embossing powder. Birthday and Father's Day are also My Creative Time stamps.


Thanks to Rachelle and the Scrapping4fun Design Team for having me as a guest today!! I hope you will join in this weeks challenge!!


I have a couple of quick pictures to share with you today. This was the view from my kitchen window this morning!! It's not a good picture at all and it was taken through the screen, which you can kinda see, but I wanted to show you how many deer came for breakfast :) Most of them were pretty young. I wish I could have stepped onto the deck to take a clearer picture but they would all scatter quickly.


And I snapped this guy the other day, also not a great pic and also through the screen. I wonder if the top picture is his harem ;)

Thanks so much for stopping by :)

Tuesday, January 17, 2017

Try It On Tuesday Guest Designer

Happy Tuesday, everyone!! I'm so excited to be a guest designer today for Try It One Tuesday!! The theme for the challenge is "Anything But Square". You can make any project for this challenge, as long as it isn't square.


I have a dear friend who is going through a difficult time and I wanted to let her know I was thinking of her. The papers are from Authentique. I started with a Spellbinders Grand Scalloped Circle, and then a Grand Circle for the base of the cards.


A TCW Art Is Stencil was used with texture paste. A Prima Persian Lace stencil was cut in half and applied on the the top and bottom for the base of the flowers.


Tucked under the Wild Orchid Craft flowers are Sue Wilson Mosaic Leaves and Memory Box Chloe Stems, along with cheesecloth and baby's breath. The beautiful crinkle ribbon is from DL.ART.


The butterfly is a Fiskars punch. The sentiments were embossed with gold embossing powder on a vellum banner, cut with a Joy Crafts Banner die.


Head on over to Try it On Tuesday to see the amazing projects the talented design team have created for today's challenge!! Then I hope you'll join in with your Anything But Square project!! I want to sincerely thank Avril and the DT for having me guest design with them today!!


Thanks so much for stopping by!! Have a great day :)

Thursday, December 8, 2016

A Vintage Journey Guest Designer

Hi, everyone!! I'm so excited and honored to be a guest designer today at A Vintage Journey!! AVJ is a challenge blog focusing on vintage, shabby, mixed-media, art journaling, industrial, timeworn and steampunk genres. Design Team Member Deb has chosen the theme "Winter Magic". Here's how she describes the challenge:

For us in the northern hemisphere December brings the start of winter and for many that means freezing cold weather and Christmas. But winter is so much more than that and so we ask, how would you interpret the magic of winter? Snow, icicles, colors of blue, silver and white, the festivities of Christmas, misty winter landscapes; show us what your magical focus is for the season and in a vintage; shabby; mixed-media; art journaling; industrial or steampunk style.


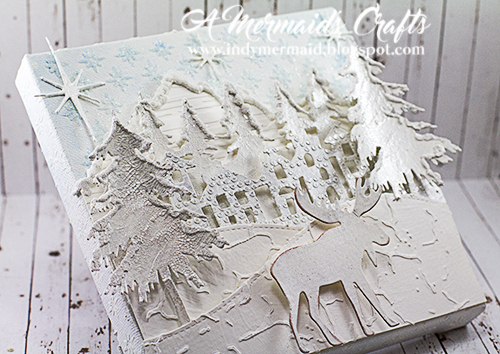
I love Deb's theme of Winter Magic!! For several years, I lived in the Adirondack Mountains in upstate New York and winters there were definitely magical (and covered in snow). I wanted to recreate that image of a wintry mountain town for my project. I started with a 6x6 canvas and covered it with Gesso.


Next, I used a stencil and crackle paste to add the snowflakes. While the paste was still wet, I added some glitter. After it dried, I brushed a light wash of Bahama Blue over the surface.


Then I chose which dies I wanted to use to create the town and cut them in watercolor paper. They were then covered with Gesso.


The mountains and hills were covered with texture paste through stencils, as was the town (not pictured).


The trees were all covered with crackle paste. Once they dried, I dabbed Tim Holtz Distress Stain in Brushed Pewter over the trees. Once it settled in the cracks, I wiped the excess off.


The village and moose were brushed with Brushed Pewter Distress Stain as well.


To finish it off, I used DecoArt Snow Writer to create the dimensional snow, and while it was still wet, I covered it in crystal ice glitter for that freshly fallen snow look.


I want to sincerely thank the extremely talented design team for A Vintage Journey for allowing me to design with them today!! Thanks so much for stopping by!! Have a great day :)

Thursday, September 29, 2016

Scrapping4fun Challenges Guest Designer

Happy Thursday evening!! I'm so excited to be a guest designer at Scrapping4fun Challenges!! The theme for Challenge #75 is Fabulous Autumn Colors.


For my cards, I used watercolor paper that had been sprayed with Dylusions Sprays and then stamped with a Darkroom Door Script stamp in Red Geranium Archival Ink.


I cut the Penny Black Branching Out tree die from the paper and then cut it again in black. I inserted the black tree in the opening and then popped up the tree cut from the watercolor paper with foam for dimension.


Grateful is a My Creative Time die and I cut it in black sticky-back foam. The sequins are from My Craft Spot (no longer in business).


The leaves were cut with My Creative Time A Thankful Heart leaf dies from sprayed paper I had in my stash. The edges were inked with Gathered Twigs Distress Ink. The crinkle ribbon is RAO Red from The Newspaper Bundle at DL.ART. The pine cone is an Elizabeth Craft Pine Cone die.


Finally, I splattered some black paint on the card and then sprayed it with Perfect Pearls Biscotti for a subtle shimmer.


Thank you to Rachelle and the talented design team at Scrapping4fun Challenges for having me as a guest designer this week!! And thank you for stopping by!!

Wednesday, June 8, 2016

Word Art Wednesday Guest Designer

For the Blog Hop 4 Boobies, click HERE!

Happy Wednesday!! I hope you're having a wonderful week!! I'm so excited to be guest designing this month at Word Art Wednesday!! It's one of my very favorite challenge blogs and Karen and all of he design team are so incredibly talented!!


I started with papers from Maja Designs' Vintage Summer stack for my cards. I didn't want to add too many layers or embellishments so the focus would be on the beautiful scripture from Proverbs.


Here's a close-up. I printed it on vellum and cut it out with a Taylored Expressions Banner Stacklet 1 die. I then attached it with brads.


My dapper dude is George from Tattered Lace. The clock is a Tim Holtz Clock die.


You can see this is pretty CAS for me. I'm entering it in the following challenges:


I hope you'll stop by the Word Art Wednesday blog to see the amazing projects the design team has created for today's challenges. Then link up your Anything Goes project...I can't wait to see what you create!!

Tuesday, January 19, 2016

Anything But Cute Feature Artist

Happy Tuesday!! I hope you are having a wonderful week!! I am so excited and honored to be the Feature Artist at Anything But Cute today!! I'd love for you to stop by and say hi to me there :)


If you haven't visited Anything But Cute, it's a mixed media challenge blog featuring an amazing design team that will blow you away with their creativity!! I am in awe of their talent!! Be sure to check out their projects while you're there!! You will be amazed!!


I love Anne's theme of Ring out the Old, Bring in the New for this challenge!! I used several new products on this card, starting with the base papers from Lemoncraft's House of Roses paper stack. The paper is so beautiful, I hated covering any of it up!! All of the edges were distressed with a Zutter Distress-It-All.


For the next layer, I used Wendy Vecchi Crackled Texture Paste with a The Crafter's Workshop 'Art Is' stencil on heavyweight cardstock. Distress Ink in Spun Sugar and Victorian Velvet was sponged on top and then it was covered with DecoArt Crackle Glaze.


On top of that layer, I used a (new) Prima Flourish with Crackled Texture Paste.  Spun Sugar and Victorian Velvet Distress Ink were sponged on as well. The banner is a Taylored Expressions Banner Stacklets 1 die. Make a Wish is from Inspired by Stamping. It was heat embossed with Sparkle N Sprinkle Snow Embossing Powder.


I used Spellbinders Rose Creations to make the flowers. I had several inquiries as to how I made the poinsettias on my winter sled card (here) so I thought I'd put together a quick tutorial (please ignore the stained craft mat ;)


You will need a pair of flat-edged pliers, a water spritzer several different sizes of paintbrushes (or any round tools) and the Rose Creations dies. I started off cutting two of each of the five sizes of the flowers in heavyweight cardstock.


Spritz the flower with water...you want it to be pliable when you shape the sides. This is different from how I created the poinsettias. The individual petals of the poinsettias are so thin at the base, they tend to tear if the paper is too wet. With those, you want the paper damp but not wet.


Wrap the petal around a paintbrush and grip the top and bottom.


With the flat-edged pliers, start scrunching the sides together.


You will work up and down the petal until you get the texture you desire.


If the paper starts to dry, you may need to give it another spritz of water.


Once you have all of the petals done, use a stylus tool to shape the flowers.


Glue the two flowers of the same size together, offsetting the petals as much as possible. I use Glossy Accents but you could use hot glue or any glue of your choice.


Now it's time to layer your flower. You may not need all of the petals to achieve the look you like. I left off the next to smallest set of flowers.


For an subtle shine, I added Iridescent Red Twinkling H2O's to the petals.


Once that was dry, I brushed DecoArt Glamour Dust (new) over the petals so they really sparkle.


I finished off the flowers by adding pearl stamens from Wild Orchid Crafts.


I tried to capture the sparkle, but it doesn't show up very well.


Memory Box Botanical Stems and (new) Marianne Designs Leaves were tucked among the blooms.


A Tim Holtz Weatherd Clock die was also tucked under the flowers. It was covered with DecoArt Crackle Paste and then inked with Spun Sugar and Victorian Velvet Distress Inks.


The beautiful crinkle ribbon is from DL.ART.


The butterfly is a Memory Box Isabella die. It was covered in DecoArt Glamour Dust. The paint splatters were created with my new Tim Holtz Splatter Brush.


I am entering this in the following challenges:

1. Emerald Creek Dares - New
2. Little Scrap Pieces - Show if Off Saturday
3. 2 Creative Chicks - Anything Goes
4. Pause, Dream Enjoy Linky - Anything Goes
5. Sparkle N Sprinkle - Anything Goes Using Glitter/Embossing Powder/Flocking
6. Where the HeART is - Anything Goes
7. Live & Love Crafts - Something New
8. Really Reasonable Ribbon - Look What I Got
9. Word Art Wednesday - Anything Goes


I would like to thank Pamellia, Anne and all of the amazing ABC Design Team for having me as a guest today!! If you haven't already, I hope you will join in the Ring out the Old, Bring in the New Challenge!! I can't wait to see what you create!!

LinkWithin

Related Posts Plugin for WordPress, Blogger...