H G Tut H C DT A F FB E P E Image Map
Showing posts with label Fashionable Friends SS. Show all posts

Monday, March 30, 2015

Hat's Off To You!!

Happy Monday!! I hope you had a wonderful weekend!! It's my turn to post on the Die-Versions blog and I have a card to share with you using the Straw Hat die from the newest release. I also have some information to share with you...I'll do that after I show you my card.


I wanted my new Whispers Straw Hat die to have some dimension, so I cut it four times and then cut the center circles out, popping each layer up with teeny-tiny bits of foam tape. I mounted the hat on a Whispers Heart Burst die so it looks like it has a lacy edge :)


I cut a few Whispers Daisy Flair dies and tucked them among the Wild Orchid Crafts flowers. The button on the bow is a Wee Petites Button die. Hat's off to you is from an old K Andrew Designs Fashionable Friends stamp set. Also, I've been sewing on most of my cards again. I had quit for a while because I was always having trouble with the thread. My Mom suggested that I get more expensive thread (I had like the cheapest you could get!) and it made all of the difference!!


This is the first time I've used the new Straw Hat die, so that qualifies for Darnell's NBUS Challenge!! If you aren't familiar with the amazing Darnell or her "Never Before Used Schtuff" challenge, head on over to her blog, DJKardKreations for all the details!! I'm also entering it in Diana's DLArt March Linky party.


NOW, about the info I want to share...I'm going to try something new this week. Real life is seriously cutting into my crafting time and I have less and less time to blog. I've pretty much given up Facebook except for DT commitments already, and I'm still cramped for time. Visiting your blogs is one of the highlights of my day...I love seeing what everyone is creating. However, commenting is taking up between 1 1/2 - 2 hours a day!! I'd been trying to leave comments both in the morning and evening when I get the chance but it is still taking up too much time. So I'm going to see if commenting once a week will work, probably on Sunday. I'll go back and hit all of the projects you've created during the week. I wanted to let you know since I won't be around as often, BUT I will still be around and still comment on your projects :) Thanks for your understanding!! Have a wonderful week - it's almost April :)

Sunday, August 11, 2013

100 Days of Tombow Centennial Celebration

Happy Sunday!! I hope you are having a fabulous weekend!! It's been beautiful here - sunny and low 80's. We were supposed to get some rain but so far, the sun is shining :)


I am so honored to have been asked by Tombow to participate in 100 Days of Tombow Centennial Celebration. In March of this year, Tombow kicked off its "100 Days of Tombow" program at the National Art Education Association Conference in Forth Worth, Texas. They asked 100 different bloggers across America to share a project using Tombow's products. For every submission by a blogger, Tombow donates $100.00 worth of products to the Council for Arts Education, a national nonprofit dedicated to promoting and supporting art education and quality art programs nationwide, with an overall goal of $10,000 worth of product.


The package I received included Irojiten Color Pencils in Light Grayish Tone 1, Dual Brush Pens in Jelly Bean and a Stamp Runner. I absolutely love the stamp runner...it's ergonomic so it fits in my hand perfectly, and it functions as either a traditional tape runner or a stamper. And I love pink :)


I used the Dual Brush pens to color a Tim Holtz dragonfly stamp from the Classics #1 set. The pens stayed wet long enough for me to color in all of the design and then stamped perfectly. I love the look of a multicolored stamp :)  The tag base is a Sizzix Tim Holtz Tag and Bookplate die, with paper from Basic Grey Out of Print. The stamp is on a Spellbinders Labels 2 die and it was attached with the stamp runner. The gorgeous crinkle ribbon is from my dear friend Karen of Little Scrap Pieces.


I tried the same technique on another card, coloring the sentiment as well. The stamp is from the Tim Holtz Floral Tattoo stamp set. The sentiment is from StampingScrapping Label Accents stamp set. The base is a Spellbinders Big Scalloped Ovals Large die with paper from Bo Bunny's Garden Girl stack. The next layer is a Spellbinders Classic Ovals Large die, the edges inked with TH Dusty Concord Distress Ink.


I wanted to try out the pencils, too, so I created two cards, one using the markers and the other the pencils. The base of both cards and the next layers are Spellbinders Resplendent Rectangles dies, and the stamp is a Dylusions Mini Couture stamp.


It's a little hard to see in the pic, but I outlined the black layer with a Irojiten Color Pencil in Wax Yellow. The stamp was stamped with Versafine Onyx ink and colored in with Irojiten Color Pencils in Sea Fog, Campanula Blue and Porcelain Blue. The pencils have a very creamy texture and they apply smoothly. They are awesome!! The banner tag is a Spellbinders Nested Lacy Pennants die, colored in with Campanula Blue. The sentiment is from K Andrew Designs Fashionable Friends stamp set. Everything was attached with the Tombow Stamp Runner.


For the next card the stamp was colored in with the Dual Brush markers and a TH waterbrush. The color flowed beautifully with the water brush.

I am entering this in the following challenges:
  1. DL.Art - Thankful Thursday - August Anything Goes
  2. Sunday Funday - August Linky Party
  3. Just B Creative Crazy - Just Because Linky Party
Thanks so much for stopping by!! Have a fabulous rest of the weekend :)

Wednesday, February 13, 2013

Hello Friend!!

Happy Wednesday, and happy Ash Wednesday to all my Catholic friends :) I hope you are having a great week!! It's my turn to post at Getting Cricky and I have a friendship card to share with you today.


In my new year's resolution quest to learn new techniques, I came across THIS one from my sweet and amazingly talented friend Beate of Fresh and Fun. I love the look of bricks...stamps, stencils, embossing...and this looked so amazing, I had to try it!!


The base of the card is black cardstock from The Paper Studio. The rest of the paper is heavy weight white cardstock from Canvas Corp. The bottom white layer was cut with a Spellbinders Grand Rectangle. The nest two layers were cut with Spellbinders Card Creator Matting Basics A and B sets. I popped each layer up with foam tape for dimension. The stamp is from the Tim Holtz Nature's Discovery stamp set. It was stamped first in New Sprout ink from Memento, and then Cottage Ivy. Then the paper was cut into strips to make the bricks...first 1/2 inch strips and then they were cut into 3/4 inch bricks. The cuts were staggered to give the appearance of a brick wall. The edges of the bricks and the paper were sponged with Tim Holtz Frayed Brick Distress Ink.  The ribbon is from May Arts. The sentiment tag is a Spellbinders Nested Pennant die. "Hello Friend" is from K Andrew Designs Fashionable Friends stamp set:


You can pick this set up for 60% off, but hurry...there is only one set left!! Click HERE to visit the online store.


I am entering this in the following challenges:
  1. Dl.Art Thankful Thursday - Linky Party
  2. Sunday Funday #6 - Linky Party
Thanks so much for stopping by :)

PRODUCTS USED:

Thursday, August 2, 2012

Getting Cricky DT Post - Fashionable Friends

Happy Thursday, everyone!! I hope you are having a great week!! It's my turn again to post at Getting Cricky and today, I'm flashing back to a couple of projects featuring K Andrew Designs Fashionable Friends stamp set. I'm so loving these flashback posts, mostly because I can't seem to separate myself from the TV and/or computer watching the Olympics to craft!!


My first flashback card is from February 15th. Click HERE to see the original post with project details.

I am entering this in My Crafting Channel's Fabric Friday #5.


My second project is from September 21st of last year. Click HERE to see the original post with details.


Click HERE to purchase this set or to see the entire fabulous line of K Andrew Designs stamps!!

I am entering both cards at DL.ART's Happy Birthday Linky Party.

Head on over to Getting Cricky to see the amazing projects my Design Team sisters have created!! Thanks so much for stopping by :)

Friday, May 18, 2012

Getting Cricky Summertime Blog Hop!!

Welcome to the "Summertime" Getting Cricky Blog Hop!!


We're so happy you could join us for this month's Getting Cricky Design Team Blog Hop!! We'd like to invite you to visit each of our DT Sisters' Blogs (it's just half the crew this month -- you'll see the other half next month!!) and our very special Guest Designer, Melissa of Needful Things!!

Throughout the hop we'll be showing what we love about.... SUMMERTIME!! From parties and celebrations to campfires and s'mores, we hope you'll enjoy each and every project along the way!! Sooooo, let's get hopping...

If you've hopped along from my dear, sweet, amazingly talented friend Amy of Love To Crop!, then you are in the right place!! If you are just joining me from your dashboard, or reading this via email, please be sure to CLICK HERE to start at the beginning with Kristal's blog (you'll want to catch up on all the FUN and you don't want to miss the opportunity for BLOG CANDY!!)...

Each of Kristal's stamp sets benefit charity. At least $1 per stamp set goes to benefit the charity noted on the stamp set package. Kristal is donating to the following charities: Cancer Angels, Storefront Shelter for Homeless Children, Intrepid & Fallen Heroes, E. Glaser Pediatric AIDS Foundation, Doorways Shelter for Women & Children (Domestic Violence), Wayside House for Women, Camp Good Days & Special Times, Adopt a Classroom, and Autism Research Institute. Kristal will donate $1 for every stamp set sold, retail or wholesale to the charity noted; and over time believes this will add up to some wonderful miracles for these special people. So you can feel good that each time you purchase a K Andrew Designs art stamp set, someone around the country is receiving some good help!

K Andrew's stamps are all made and assembled here in the USA, which is very important to Kristal. This ensures all product materials are safe and that jobs are being provided and maintained here in America. You can learn even more about Kristal's stamps (and pick some up for yourself) by visiting her online store: K Andrew Designs:


Kristal's stamp sets are perfect for cards, layouts, and so much more...

For my project, I'm featuring the Splashtastic Summer and Fashionable Friends stamp sets!!

Splashtastic Summer

Fashionable Friends

For more details or to make these sets YOURS, please click on the preview!! Plus...enter the code "newship" to receive FREE SHIPPING  on your entire order during the hop!! What an awesome deal!!


I love just about everything about summer...the sun shining, being outdoors, long days, trips to the beach, camping. And during the summer (and okay, Spring, Fall and Winter when possible ;) I live in flip-flops!! I have sporty ones, dressy ones and everything in between :) So for my project, I created a gift box to hold a summery surprise (I know I still owe a tutorial on making a box and I will get to it soon!!) I embossed the box with the Sizzix Flower Clusters embossing folder...they look like hibiscus. I cut a hibiscus from Life's a Beach three times and pop-dotted between layers to give it dimension. The paper is from Core'dinations Core Couture. I used a Spellbinders banner tag for the sentiment "Enjoy the summer" from Splashtastic Summer.


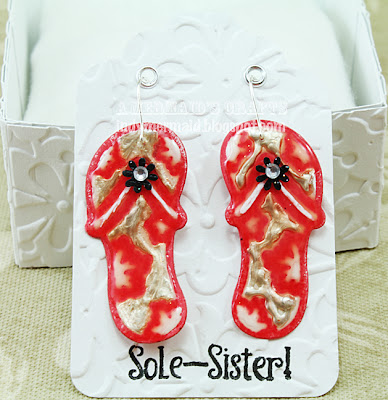
Inside the box is a pair of flip-flop earrings!! The flip-flops are from Spellbinders Surf's Up dies. The tag is a Marvy Uchida mega-punch, also embossed with Flower Clusters. I added eyelets with my Crop-a-dile. "Sole-sister!" is from Fashionable Friends.


I colored in the white parts with Ranger White Enamel Accents and used platinum Liquid Pearls for the rest. Once they dried, I covered both shoes with Glossy Accents. The black flower is a little cheapy punch and I attached a Paper Studio crystal.


I lightly stamped the back of the earrings with Barn Door Distress ink and then stamped "Aloha" from Splashtastic Summer on both.

I have BLOG CANDY!! I am giving away a set of Pirate Tales and Fish Scales stamps!!


There are so many creative and fun sentiments and images on here!! All you have to do to be eligible to win this set is:
  1. Be a Follower of my blog
  2. Leave me a comment with a way to contact you
That's it!! I will choose a winner on Wednesday, May 23rd!!

We'd also like to share TWO BRAND NEW Stamp Art Sets that are now available for Pre-Order with an expected ship date of May 25th!! If you want to be one of the FIRST to own these SUPER-CUTE sets, you'll definitely want to order TODAY (clicking on the previews will take you directly to the order page!!)...

Guy Talk

Southern Sayings

Don't forget to enter the code "newship" for FREE SHIPPING on all your purchases during the hop!!

Now you can hop on over to your next stop: the awesome and talented Miranda of Nana's Scrap Spot!!


.......................................

Tuesday, April 10, 2012

From One Fashionista To Another and Blog Candy WINNER!!

Happy Tuesday, everyone!! Thank you so much for the well wishes on my injury...all of the prayers and positive thoughts have definitely helped!! The shoulder is feeling better each day. I've kept it iced and immobilized and I haven't had to pop pain pills in two days, which I'm very happy about...I hate having to take them.


I have a card to enter into a couple of challenges today. I had some of the pieces pre-cut, so that helped because I am not very good crafting one-handed :) The paper is from My Mind's Eye Lost and Found Madison Avenue stack.


I distressed the edges of the background paper before stitching it to the pink paper. Spellbinders used are Nestabilities Labels 11, Nestabilities Classic Squares Large and Fleur de Lis squares (I just love this die!!). Everything is popped up with foam tape for dimension. Both strips of lace are from The Paper Studio and the crickle ribbon is from Karen of Little Scrap Pieces :)


I used Walnut Distress ink on the edges.


From one fashionista to another is from K Andrew Designs Fashionable Friends stamp set:


Click HERE to purchase your own set or to see her entire fabulous line of stamps!!


I am entering the card in the following challenges:
  1. Love to Crop - Say What?? - Say Anything... Challenge
  2. Crafty Friends Challenge #1 - Vintage

BLOG CANDY WINNER!!

And now to announce the winner of my blogaversary giveaway!! I wish I could give something to everyone!! You all are my inspiration and my motivation and I am so thankful to have such amazing blog friends!! I you all :)

I thought about using Random.org to choose the winner, but I wanted to make sure everyone had the correct number of entries and some people posted my giveaway or blogged about it and didn't leave an extra comment. So I kept track of everyone and printed out all the names. Using my good arm (and some help from friends!!), I/we cut out all the names, tossed them in a box and I had my Mom pick out a name...I wanted to take a picture of my Mom picking out the winning entry, but she wouldn't let me :P And the winner of the box of goodies is.................................................................................

 .................................................................................

 .................................................................................


Yay!! Congratulations, Susan!! I hope you enjoy the goodies!! I will get them in the mail to you in the next couple of days!!

I want to thank everyone again for following me!! I love having giveaways, and I will have at least two more this month, so stay tuned... :)

Tuesday, March 27, 2012

Getting Cricky Tuesday Tutorial


Hi everyone and happy Tuesday!! I hope you are having a great week!! I have a tutorial today on how to make a Spellbinder's purse that I am also sharing at Getting Cricky!! Some of you might remember the purse I made for Amy Jo's Birthday Bash Blog Hop in February...this tutorial will explain how to make one like it :)


I first saw this purse on the Spellbinders blog HERE and just loved it. I didn't have the same dies to make their version, so I had to alter it to fit what I had on hand. Once you understand the basics of the purse, it is easy to adjust the measurements to fit any die cuts that you have available.


SUPPLIES:

- Spellbinders Grand Nestabilities Labels 23
- Spellbinders Grand Nestabilities Labels 4
- Spellbinders Nestabilities Labels 4
- Spellbinders Grand Calibur
- Paper
- Adhesive
- Flower Shoppe cartridge, or any decorative flower
- Circle Punch
- Crop-a-Dile or hole punch
- 20 gauge wire
- Beads
- K Andrew Designs stamps


1) Cut two sets of the largest three shapes from Grand Nestabilities Labels 23…this will be the base
2) Cut the largest three shapes from Grand Nestabilities Labels 4...this will be the top of the purse
3) Cut the largest three shapes from Nestabilities Labels 4...this will be the tag


4) Adhere the three layers together for the front and back panels


5) Cut at least 1/2" off the top of each panel so you have a flat surface. I cut them down so that the panels are 5” each


6) Using a large circle punch, punch a half-circle on the front panel of the purse


7) Cut a piece of paper 10” x 8”
8) On the 10” side, score at 4 1/4" and 5 3/4"…you want a 1 1/2" section in the middle
9) On the 8” side, score at 1 1/2" and 6 1/2"
10) Fold along all of the score lines
11) Cut the center score lines on both sides


12) Fold into a box and adhere sides together


13) Adhere to the piece that has the punched half-circle


14) Punch a circle in the box to match the base


15) Adhere back panel to box


16) On the top panel, score 3/4" inches from the center in each direction. The 1 1/2" will be the width of the purse


17) Decide where you want the handles to go and punch a hole on either side of the middle section. I punched 1” from either side


18) Attach eyelets


19) Add a handle. I used 20 gauge wire and beads, but you could also use ribbon
20) For beaded handle: cut 1 foot strip of 20 gauge wire, string beads in a pattern you like, attach to purse. I used a bead on the inside and wrapped wire around it to hold it in place


21) Adhere top flap to purse using strong adhesive


22) Mark where other side of the magnetic snap will go and attach to base of purse


23) Time to decorate!!


24) Kristal's Fashionable Friends stamp set is perfect for this!! I used "You've got purse-onality"


25) Add a flower to cover the magnetic closure. I used Flower Shoppe and added blue rhinestones, but you could use any flower or even buttons and ribbon


And the finished purse!!


Here's the one I made for Amy Jo's Birthday Bash Blog Hop. I had a question from someone who didn't have Spellbinders, asking if the purse could be made with a Cricut and it definitely can!!


I created this purse with Elegant Edges. The construction is basically the same but the measurements are different. There are already so many pictures, I won't include them but here are the key measurements needed to make the purse using Elegant Edges. This one is taller because I wanted the bird cut-out included.

BASE OF PURSE – Page 56
1) Cut two of the shadow at 8.25 x 6.75
2) Cut two of the shift at 8.25 x 6.05
3) Cut two of the shift at 7.60 x 5.60
4) Cut 1” off the top of each panel so you have a flat surface

TOP OF PURSE – Page 25
1) Cut the shadow at 9.75 x 6.25
2) Cut the shift at 9.75 x 5.80
3) Cut the shift at 9.00 x 5.20

TAG – Page 25
1) Cut the shadow at 3 x 1.73
2) Cut the shadow at 2.60 x 1.50
3) Cut the shadow at 2.20 x 1.27

BOX
1) Cut paper at 12 x 9.5
2) Score 12 side at 5.25 and 6.75
3) Score 9.5 side at 1.50 and 7


I hope you enjoyed the purse tutorial!! If you make one, please stop by and let me know...I'd love to see it!! Thanks so much for stopping by and have a great day :)

LinkWithin

Related Posts Plugin for WordPress, Blogger...