H G Tut H C DT A F FB E P E Image Map
Showing posts with label Mixed Media Canvas. Show all posts

Thursday, December 8, 2016

A Vintage Journey Guest Designer

Hi, everyone!! I'm so excited and honored to be a guest designer today at A Vintage Journey!! AVJ is a challenge blog focusing on vintage, shabby, mixed-media, art journaling, industrial, timeworn and steampunk genres. Design Team Member Deb has chosen the theme "Winter Magic". Here's how she describes the challenge:

For us in the northern hemisphere December brings the start of winter and for many that means freezing cold weather and Christmas. But winter is so much more than that and so we ask, how would you interpret the magic of winter? Snow, icicles, colors of blue, silver and white, the festivities of Christmas, misty winter landscapes; show us what your magical focus is for the season and in a vintage; shabby; mixed-media; art journaling; industrial or steampunk style.


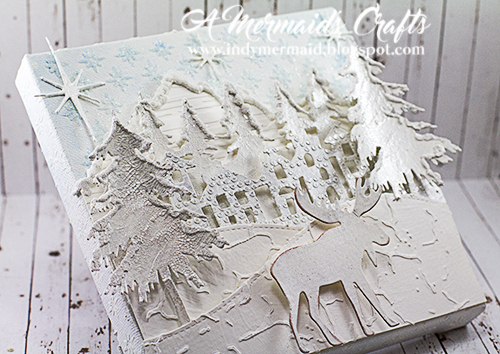
I love Deb's theme of Winter Magic!! For several years, I lived in the Adirondack Mountains in upstate New York and winters there were definitely magical (and covered in snow). I wanted to recreate that image of a wintry mountain town for my project. I started with a 6x6 canvas and covered it with Gesso.


Next, I used a stencil and crackle paste to add the snowflakes. While the paste was still wet, I added some glitter. After it dried, I brushed a light wash of Bahama Blue over the surface.


Then I chose which dies I wanted to use to create the town and cut them in watercolor paper. They were then covered with Gesso.


The mountains and hills were covered with texture paste through stencils, as was the town (not pictured).


The trees were all covered with crackle paste. Once they dried, I dabbed Tim Holtz Distress Stain in Brushed Pewter over the trees. Once it settled in the cracks, I wiped the excess off.


The village and moose were brushed with Brushed Pewter Distress Stain as well.


To finish it off, I used DecoArt Snow Writer to create the dimensional snow, and while it was still wet, I covered it in crystal ice glitter for that freshly fallen snow look.


I want to sincerely thank the extremely talented design team for A Vintage Journey for allowing me to design with them today!! Thanks so much for stopping by!! Have a great day :)

Monday, September 5, 2016

Anything But Cute Challenge #17 - Friendship

Happy Monday and happy Labor Day to all my friends in the USA!! I hope you had a wonderful weekend!! It's time for a new monthly challenge at Anything But Cute!!


The sweet and talented Branka of Vintage Homemade is our fabulous hostess this month and she's chosen the theme "Friendship". Here's what she had to say about the theme:


Friendship is a relationship of mutual affection between two or more people. We want you to show us a mixed media creation that's inspired by friendship. You can create anything, from tags to art journal pages but make sure it's a mixed media piece. Let's celebrate friendship together!


For my project, I created a friendship canvas for one of my oldest friends, incorporating several of her favorite things. I started with an 8 x 10 canvas and flipped it over. I covered the canvas with gesso and then applied drywall tape to the edges.


Next, I applied crumpled white tissue paper to the center for texture.


I added texture paste through a Tim Holtz Brick stencil to the background.


For added texture, I applied crackle paste to a piece of heavyweight cardstock and applied it to the canvas. I also added the crackle paste to the sides using the brick stencil. I applied paste through a Crafter's Workshop Art Is stencil as well (not pictured).


Now to fill in the background. I used a Cuttlebug die to cut the flowering vines in cardboard.


I cut other pieces in cardboard and covered them with gesso.


I added some some chipboard pieces, buttons and lace, as well as the friends forever wood pieces. I coated the entire canvas with gesso. This is where things went a little sideways. I wanted to use my Finnabair Mica Powders to color the canvas, but my experiment was a huge disaster. I'm too embarrassed to show you what it looked like, so I covered the entire canvas with black gesso and started again :)


This time, I used several different colors of Viva Decor Inka-Gold. After I had the canvas the colors I wanted, I used white gesso and a dry brush to highlight different parts of the canvas.


I am entering this in the following challenges:

1) Jo's Scrap Shack Funday Friday - Anything Goes
2) Simon Says Stamp Wednesday Challenge - Anything Goes
3) Emerald Creek Dares - Anything Goes
4) A Vintage Journey - Create Within a Frame
5) Creative Artiste - Anything Goes Mixed Media


Now it's your turn!! Head on over to Anything But Cute to see the amazing projects my design team sisters have created for today's challenge!! Then link up your mixed media Friendship project!! I can't wait to see what you create :)

Tuesday, July 5, 2016

Anything But Cute July Challenge - Summertime Fun

Happy Tuesday!! It's time for a new challenge at Anything But Cute. The sweet and wonderful Anne of Redanne is our hostess for this month's challenge and she has chosen the theme "Summertime Fun". Here's what she has to say about the theme:


What does Summertime fun mean to you? Spending time by the seaside, foreign travel, camping in the great outdoors or simply enjoying time in the garden? Create a MIXED MEDIA project focusing on how you like to spend your Summertime. Don't forget to tell us how your project relates to our theme.


Summer to me means the beach. I love spending time by the water, whether it be a creek, lake or the ocean. For my summertime project, I created my perfect vacation spot...a cabin by the ocean :)


I started by covering the canvas in super heavy gesso, using a pallete knife to give it texture. I added some crackle glaze to the corners and let it dry.


Next, I started building color. I used sprays and gelatos in colors of yellow, green, blue and tan.


More color, using DecoArt Media Sprays and Dylusions Sprays.


Once the colors dried, I used Paper Artsy Grunge Paste to adhere cheesecloth to the bottom of the canvas, as well as Liquitex Glass Beads gel.


To create the rocks, I cut thin pieces of styrofoam packing material into rock shapes. Then I mixed gray and metallic paint to cover them.


On the part I wanted to be the sandy hill, I dabbed on acrylic paint and while it was wet, I covered it with real sand.


For my shabby beach cottage, I used a Tattered Lace Cabin die. I covered it using Andy Skinner's Mega Crackle technique.


I selected what die cut pieces I wanted to use and cut them in grunge board. I then covered them with gesso. I sanded down the fence for a shabby look and used acrylic paint and distress ink to color the remaining pieces.


Mr. Pelican enjoying the view :)


I used gesso to create the sea foam.


A close-up of the crackle texture.


The sign is a Die-Versions Life is Better at the Beach Cute Cube. I covered it in gesso and then used DecoArt Antiquing Medium. Viva Inca Gold Metallic Rub was randomly brushed over it. I adhered the cube to a piece of double sided tape and then covered it with sand.

I am entering this in the following challenges:

1) Simon Says Stamp Wednesday Challenge - Anything Goes
2) Dies R Us - Outdoor Fun
3) Little Scrap Pieces - Show If Off Saturday
4) My Sheri Crafts #185 - Down At The Beach


Now it's your turn!! Head on over to Anything But Cute to see the amazing projects my design team sisters have created for today's challenge!! Then link up your Summertime Fun mixed media project!! I can't wait to see what you create :)

Thursday, May 5, 2016

Anything But Cute May Challenge - Celebrate Your Style


Happy Thursday!! Three posts in three days...that might be a record for me ;) I'm so excited for my first post with the Anything But Cute Design Team!! I have to warn you...this is a picture heavy post!!

As we celebrate our First Anniversary at Anything But Cute, we want you to celebrate what you do best...mixed media!! This is your chance to do it your way, in your favorite style...so pull out those inks and paints and show us what you're made of!! You can make anything you want, in any theme you want and any style you want, just as long as it has some mixed media products on it and no cute images. HAVE FUN!!

We have some special treats for you this month. Along with our design team projects, we have invited our Favorite Artists from last year to come and celebrate with us. You don't want to miss the incredible line up of inspiration they have provided for you!! We also have a wonderful line up of prizes from some amazing sponsors...lots of chances to win some goodies, so don't miss out!!


To celebrate my style, I created a mixed media, shabby chic canvas. For the background, I used one of my very favorite techniques - Andy Skinner's Mega Crackle (you can watch the video HERE).


I added texture paste through stencils in random areas for some added texture. This one is the Art Is stencil. The sentiment is from Dylusions. I stamped it with Jet Black Archival Ink and cut around each line. I then used a Black Distress Marker to outline the words.


The butterflies are Tim Holtz Butterfly Duo dies. I cut the bottom layer in heavyweight cardstock and then stamped a Darkroom Door Script stamp in Victorian Velvet Distress Ink and inked the edges as well. The top layer was cut with Lemoncraft paper and covered with Sparkle N Sprinkle Crystal Ice.


Among the Wild Orchid Crafts blooms are several dies, inked with Shabby Shutters and Peeled Paint Distress ink: Memory Box Chloe Stem, Poppystamps Weeping Willow Branches, Sue Wilson Faux Quilled Leaves, Memory Box Tender Leaves, Poppystams Viola Leaves and Elizabeth Craft Curly Leaves.


The birds are Tim Holtz Paper Punch. They were covered with Wendy Vecchi Crackle Texture paste and then inked with Victorian Velvet Distress Ink. The fence is an Impression Obsession Beach Fence. It was stamped randomly with a Tim Holtz text stamp in Gathered Twigs Distress Ink for a distressed look. The grass is a Poppystams Grassland Border, inked with Shabby SHutters.


The flower and bee, and the sentiment on the bottom corner are Tim Holtz Remnant Rubs. I am entering this in the following challenges:

1) Simon Says Stamp Wednesday Challenge - Stencil It (TCW Art Is Stencil)
2) Simon Says Stamp Monday Challenge - Home Decor
3) Word Art Wednesday - Anything Goes
4) Pause, Dream Enjoy Linky - Anything Goes
5) 2 Creative Chicks - Anything Goes
6) Decorate to Celebrate - Anything Goes
7) Little Scrap Pieces Show it Off Saturday - Anything Goes
8) Emerald Creek Dares - The B's...Buttons, Brads, Etc... (Butterflies)


Now it's your turn!! Head on over to Anything But Cute to see the amazing projects my design team sisters have created for today's challenge!! Then link up your mixed media project showcasing your style!! I can't wait to see what you create :)

Thursday, August 27, 2015

Expand Your Horizons...

Happy Thursday!! I hope you are having a wonderful week...it's almost Friday :) I have a mixed media canvas to share with you today. I wanted to create the look of a magical, mysterious forest.


Because my time is limited in my craft room, it literally takes me a month to complete a canvas. I do a little bit, set it aside to dry and then add more the next time I'm in there. So I'll try to remember all the steps I took to create this. I started out with crumpled tissue paper and adhered it to the canvas with Claudine Hellmuth Multi-Medium. Once it was dry I used a The Crafter's Workshop Brick stencil and applied Wendy Vecchi Crackle medium.


I then cut a few Memory Box Yorkshire Tree dies in foam and adhered them to the canvas, wrapping them around the sides and top as well.


Next, I adhered a Poppystamps Weeping Willow Branches die to the top, and Poppystams Grassland Border to the bottom of the canvas. Once all of the dies were in place, I covered the entire canvas in black gesso (which made it hard to see the cracks in the bricks). I then used Twinkling H2O's in Pearl Green and a touch of Mustard Green to cover the canvas. Once that dried, I brushed on Perfect Pearls in Spring Green and Duo Green Yellow. Finally, I spritzed the canvas with Perfect Pearl Perfect Pearls Mist and then Glimmer Mist in Iridescent Gold. The magical little bubbles are Skittles from Doubleclick AKA A Busy Bee in Meadow.


The fairy is a Spellbinders Ariana die. She was covered with Sparkle N Sprinkle Moonrise Glitter. Viva Inka Gold Metallic Rub was then rubbed over her and finally, she was covered in Glossy Accents. Her wand was embossed with Sparkle N Sprinkle Frosted Juniper. You can see a bit of the crackle in the bricks, but not like before I added the black gesso.


I am entering this in the following challenges:

1) Anything But Cute - Making Magic (see inspiration pic below)
2) DL.ART - August Linky
3) Little Scrap Pieces - Show it Off Saturday
4) Simon Says Stamp Wednesday Challenge - Anything Goes
5) 2 Creative Chicks - Anything Goes
6) Dies R Us Challenge - The Great Outdoors


Thanks so much for stopping by!!

LinkWithin

Related Posts Plugin for WordPress, Blogger...