H G Tut H C DT A F FB E P E Image Map
Showing posts with label TH Distress Markers. Show all posts

Tuesday, November 29, 2016

Tim Holtz 12 Tags of 2016 - November

Hi everyone and happy Tuesday!! I have had a hard time getting in my craft room this month...hence the last minute entry into Tim's 12 Tags of 2016!! I've entered every month so far so I couldn't miss this one!! And I am short of time today, so this will be a quick post :)


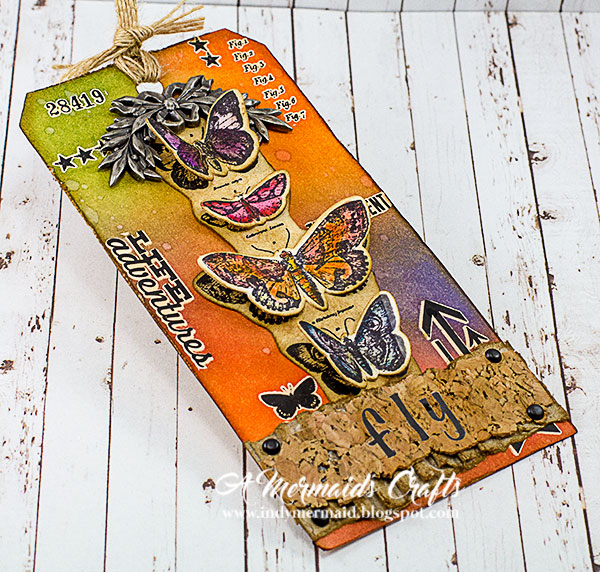
My tag is quite a bit different from Tim's this month...I used products I had on hand. For the Remnant Rub Resist, I started with Remnant Rubs and then Distress Inks in Spiced Marmalade, Squeezed Lemonade, Ripe Persimmon, Mowed Lawn and Mermaid Lagoon. The edges were inked with Gathered Twigs. For the Dimensional Coloring, I used the butterflies from his French Flight Framelets and colored them with Distress Markers and a TH Waterbrush. The metal leaves are from his Idea-ology Adornments Nature set.


I am entering this in Tim's 12 Tags of 2016 Challenge.


Thanks so much for stopping by!! Have a great day :)

Sunday, July 3, 2016

Tim Holtz 12 Tags of 2016 - July

Happy Sunday!! I hope you are all having a wonderful weekend!! It's been raining here pretty much all weekend, which has put a damper on fireworks activity. I squeezed in a little time in my craft room to make a tag to play along with Tim's 12 Tags of 2016 Challenge. I'm 7-7 so far and even early this month :)


You can find the instructions for the tag HERE. I had to improvise quite a bit (as usual :) The stamp is from Tim's Urban Chic stamp set. This did give me the chance to use my Distress Glaze for the first time. I used Remnant Rubs for the stars.


I am entering this in Tim's 12 Tags Challenge.


To all my friends in the USA, I hope you have a safe and happy Independence Day!!


Thanks so much for stopping by!! Have a great day :)

Friday, February 19, 2016

Tim Holtz 12 Tags of 2016 - February

Happy Friday, everyone!! I hope you have fun plans for the weekend :) My craft room is still a huge mess, but I had to clear enough space to play along with Tim Holtz's 12 Tags of 2016 Challenge. I'm determined to play along every month...so far, so good :)


I followed Tim's instructions HERE, but I had to modify it with the products I had on hand. For the background monoprint technique, I used Tim's Latticework stencil. For the embossed gold, I used his Arrow stencil. I colored the Found Relatives image with Spun Sugar, Scattered Straw and Broken China Distress Markers. I used Tim's Movers and Shakers Hearts dies, and I covered them with some of his Washi tapes. The sentiments are Remnant Rubs.


I am entering this in Tim's 12 Tags Challenge. Thanks so much for stopping by!! Have a great weekend :)

Thursday, December 10, 2015

DL.ART Thankful Thursday #170 - Green & Red or Blue & White

Happy Thursday!! I hope you are having a wonderful week!! It's time for another Thankful Thursday Challenge at DL.ART. The challenge this week is Green & Red or Blue & White...your choice.


I couldn't decide between green and red or blue and white, so I created one of each. It also gave me the opportunity to use my Tim Holtz Crazy Birds stamps/dies :)


I think the papers are from Recollections' Jolly & Bright paper stack, but I'm not positive. I inked the edges of this one with Broken China Distress Ink. This guy was colored with Broken China and Faded Jeans Distress Markers and a TH Waterbrush. The glasses, candy cane and Santa hat are from the Crazy Things stamps and die sets. I used glossy accents on the glasses and glitter on the hat. The trees are a Die-Namites Winter Trees die. The snowflakes are Impression Obsession Small Snowflake dies. The gorgeous ribbon is Aruba Blue from Diana's Tropical Summer bundle. The tag and sentiment are from My Craft Spot (no longer in business).


This guy was colored with Fired Brick and Barn Door Distress Markers and a TH Waterbrush. The Santa and reindeer die is from Impression Obsession. This beautiful ribbon is Six Fathoms from Diana's The Mermaid's Tale First Edition.


Now it's your turn!! Head on over to DL.ART to see the amazing projects my design team sisters have created for today's challenge!! Then link up your green & red or blue & white project!! I can't wait to see what you create :)

Tuesday, October 27, 2015

Happy Bird-Day

Happy Tuesday!! I hope you are having a wonderful last week of October!! Anyone have any fun Halloween parties to attend this weekend? If so, are you dressing up?


I have been in love the with Tim Holtz Crazy Birds since they first came out. I don't know why it took me so long to purchase them. I used the Crazy Birds stamps and dies and the Crazy Things stamps and dies for these cards. I kept the cards pretty CAS for my first attempt at using them. I hope you don't get tired of them because I'm going to use them a lot :) For the backgrounds, I used the TH Splatter Stencil, which was one of the things I won from the TH September 2015 Tags challenge.


For this bird, I used Distress Markers in Spiced Marmalade, Ripe Persimmon, Scattered Straw and Squeezed Lemonade, along with a TH Water Brush. The background was created with the same colors of Distress Ink, plus a touch of Walnut on the edges. Happy is a My Creative Time die and the banner is a Lil' Inker Stitched Banner die. The sentiment is from an old K Andrew Designs stamp set.


This birdie was colored with Faded Jeans, Salty Ocean, Peacock Feathers and Mowed Lawn. I am entering these in the following challenges:

1) Little Scrap Pieces Show It Off Saturday - Anything Goes
2) Word Art Wednesday - Anything Goes

Thanks so much for stopping by!! Have a great week :)

Saturday, July 4, 2015

Happy 4th of July!!

Happy, happy birthday USA and happy, happy 4th of July to all of my American friends!! I hope you have a wonderful holiday filled with family, food, fireworks and fun!! Stay safe!! I will be attending a small family bbq so I won't be around much this weekend. I'll check in with you when I can :)


One of my crafty goals each year is to enter Tim Holtz's Tags challenges as often as I can, and though I try each month, I don't always make it. I was able to sneak in some time in the craft room to complete a tag for the July Challenge - I was excited that I had most of the products to work with :) I pretty much followed Tim's Instructions HERE. I didn't have the new Hickory Smoke Distress Ink, so I used Pumice Stone instead. And my Black Soot Distress Marker didn't want to work with the spritzer, so I used Walnut. The 4 is from Tim's Inside Out die, cut with silver foil. I also stitched with white thread instead of black because I was too lazy to change the thread on my machine ;)


I am entering this in the following challenges:

1. Tim Holtz 12 Tags of 2015 - July
2. My Sheri Crafts - Happy 4th of July
3. DL.ART - July Linky
4. DL.ART - Thankful Thursday - Red, White & Blue
5. Little Scrap Pieces - Show it It Off Saturday
6. Jo's Scrap Shack Funday Friday #95 - Anything Goes
7. 3 Girl Jam July Challenge - Anything Goes w/Ribbon


God Bless America!! Thanks so much for stopping by :)

Monday, July 14, 2014

Dream As If You'll Live Forever

Happy Monday!! I hope you had a wonderful weekend!! I have been having trouble with Blogger for a while now. People will leave comments for me and I don't get the email notification. I don't know that they've left the comments unless I scroll down to the comment section on my blog. Is anyone else having this problem?? I submitted a question to Blogger that has frustratingly gone unanswered. I've checked spam folders on my blog and email and nothing. I do get most of the comment email notifications, but there are a few people that always comment and I don't get theirs at all anymore. And many times, when someone new comments, I don't get that either. It's been happening for a few months now and I am so frustrated. Any help would be appreciated!! :)


I had a chance to visit my craft room this weekend and put together a tag to play along with Tim's July 2014 Tag Challenge. I absolutely love this month's tag!! I followed Tim's instructions HERE. I didn't have the larger sea horse die, so I used the mini one. I also didn't have the Bubbles Texture Fade, so I used the Ink Splatter Texture Fade


I tried to get a picture of all of the awesome texture. The cracks on the sea horse are so fun!!


I am entering this in the following challenges:
  1. Tim's 12 Tags of 2014 - July
  2. Simon Says Stamp Wednesday Challenge - Let's Be Clear
  3. DL.Art - July Linky
  4. Little Scrap Pieces - Show Off Saturday
  5. Pause, Dream, Enjoy #14 - Tags
  6. Word Art Wednesday - Anything Goes 
  7. A Vintage Journey #10 - Dies and Distress
Thanks so much for stopping by!! Have a great day :)

Wednesday, June 25, 2014

Decorate to Celebrate #78 - 4th of July!!

Happy Wednesday!! I hope you are having a great week!! It's time for another fun challenge at Decorate to Celebrate!! For Challenge #78, we are asking you to create Fourth of July or Birthday Decorations!! Let's celebrate everything wonderful about fireworks, sparklers, freedom or birthdays with your table decorations, party banners, pennants, yard signs, cupcakes, party favors and more :)


I created a 3D star decoration for my project. The star was created with a Sizzix Bigz Star Bright die with papers from DCWV. The rosettes are Tim Holtz Paper Rosettes dies.


Happy July 4th was colored with TH Distress Markers in Salty Ocean and Fired Brick. The sentiment, as well as...


Let Freedom Ring are from Craftin Desert Divas Celebrate Freedom stamp set. Click HERE to purchase.

Now it's your turn!! Head on over to Decorate to Celebrate to see the amazing projects my design team sisters have created for today's challenge. Then link you your 4th of July or Birthday projects. I can't wait to see what you create :)

Wednesday, April 16, 2014

Decorate to Celebrate #73 - Easter Part 2 or Birthdays

Happy Wednesday!! It's time for another challenge at Decorate to Celebrate!! We enjoyed seeing all of your awesome Easter Baskets so we want to see more from you!! Let's celebrate everything wonderful about bunnies, chocolates, Good Friday, the Resurrection or birthdays with your table decorations, party banners, pennants, yard signs, cupcakes, party favors and more :)


I found the tutorial for this basket HERE. The solid paper is from The Paper Studio. I can't remember where the flowered paper is from, but I think it's Basic Grey. The tag is a Spellbinders Tags and Flags die. The bunny is a Spellbinders Easter Fun die. It was colored with TH Distress Markers in Victorian Velvet, Peeled Paint, Faded Jeans and although it looks pink in the picture, the carrot was colored with Spiced Marmalade and popped up with foam tape (so it is orange!!). The banner is a Spellbinders Ribbon Banner Die. The gorgeous crinkle ribbon is from my sweet friend Karen of Little Scrap Pieces.

I am linking this up in the following challenges:
  1. DL.Art - April Linky
  2. DL.Art Thankful Thursday #130 - Easter
  3. Just B Creative Crazy - April Linky
  4. Lia Stampz #63 - Pastel Colors
Now it's your turn!! Head on over to Decorate to Celebrate to see the amazing projects my talented design team sisters have created for today's challenge. Then link up your Easter or Birthday Decorations...I can't wait to see what you create :)

Wednesday, April 2, 2014

Decorate to Celebrate #72 - Easter Baskets or Birthday

To enter my 3 Year Blogaversary Giveaway, click HERE

Happy Wednesday!! I hope you are having a great week!! It's time for another fun challenge at Decorate to Celebrate!! We would love to see your Easter Baskets or you can always enter Birthday Decorations :)


For my Easter project, I used cardstock from The Paper Studio and cut Spellbinders Decorative Labels 8 dies for the sides. A Die-Versions Loopy Lace die was used for the handle. The gorgeous crinkle ribbon is from my sweet friend Karen of Little Scrap Pieces.


Heavyweight cardstock from Canvas Corp was cut with a Spellbinders Labels 8 and then stamped with the flowery weeds stamp from Tim Holtz Spring Sprung stamp set. They were stamped with Fern Green Archival Ink and then stamped again without reinking for a shadow effect. The edges were inked with TH Seedless Preserves Distreee Ink The bunny is from the same stamp set and he was inked with TH Victorian Velvet and Seedless Preserves Distress Markers and a TH Waterbrush. A Marvy Uchida Snow Marker was used to give him a puffy tail and ears. He was fussy cut and then popped up with foam tape. The banner is a Lil' Inker Stitched Banner Die. Easter Wishes is from the Joann dollar bin.


I am entering this in the following challenges:
  1. Simon Says Stamp Monday Challenge - Anything Goes
  2. DL.Art - April Linky
  3. DL.Art Thankful Thursday #129 - Bunny
  4. Pause Dream Enjoy Linky #7 - 3D Projects
  5. Every Day is an Occasion - April Linky
  6. Just B Creative Crazy - April Linky
  7. Simply Create Too #58 - Easter or Bunnies
Now it's your turn!! Head on over to Decorate to Celebrate to see the amazing projects my talented design team sisters have created for today's challenge. Then link up your Easter Baskets or Birthday Decorations...I can't wait to see what you create :)

Wednesday, March 12, 2014

Hamilton Celebrates!!

Happy Wednesday, everyone!! Wow, what is up with Mother Nature?? The (awesome) 60's yesterday and now the forecast calls for snow today...with a low of 8!! My gosh, she is fickle :)


Most of you know I don't usually do digi's. I just don't have the patience to learn to color. But when my sweet friend Naomi of Creative Bug on the Loose started a challenge to launch her new Creative Bug Digital Snapshots store, I had to participate :)


She has several adorable digis to choose from, and she will send one to you to use in the challenge. I had a hard time choosing, but finally decided on "Hamilton Celebrates".


For my card, I used paper from Basic Grey's Shine On paper stack. The base and first layer are Spellbinders Grand Labels One dies. The edges were sanded to bring out the embossing. The next two layers are Spellbinders Decorative Labels One and Labels One. The grass is a My Creative Time Stitched Grass die.


Here is adorable Hamilton!! He was colored with a Tim Holtz Tattered Rose Distress Marker and a TH Waterbrush. The clouds were inked with Broken China Distress Ink. The balloons were colored with Spiced Marmalade, Peacock Feathers and Barn Door Distress Markers and a waterbrush. A TH Dot Face stencil was placed over the balloons and they were inked with the same colors of Distress Inks. The balloons were then cut out and popped up for dimension.


Four dies from My Craft Spot's Tiny Doily dies were used for the sentiment. The sentiment and balloon are from My Craft Spot's Stamping All Around Spring set.


A Spellbinders Charmed I'm Sure tag was used for this sentiment from My Craft Spot's Tiny Tags 1 set. A Die-Versions Buttons die was used for the button. The gorgeous crinkle ribbon is from my dear friend Karen of Little Scrap Pieces.


I am entering this in the following challenges:
  1. Creative Bug on the Loose New Beginnings Challenge
  2. My Craft Spot Monday Challenge #128 - Cute Critters
  3. Craftin Desert Divas - Birthday
  4. DL.Art - March Linky
  5. Every Day is an Occasion - March Linky
  6. Just B Creative Crazy - March Linky
  7. Word Art Wednesday #121 - Anything Goes
  8. Funday Friday #40 - Anything Goes
  9. House of Cards March Challenge #1 - Cute or Shabby - Add a Button
Thanks so much for stopping by :)

Wednesday, February 19, 2014

Decorate to Celebrate #69 - 3D Flowers or Birthday

Happy Wednesday!! I hope you are having a great week!! It's slowly warming up here...we are supposed to hit 60 tomorrow!! Woohoo!! It's time for another challenge at Decorate to Celebrate!! For Challenge #69 we are asking you to make 3D Flower or Birthday Decorations :)


For this challenge, I created a flowery hat box and flower earrings.


I made this a couple of months ago and forgot to write down the measurements on how I made the hat box and I've already sent this off. I do remember it was made with strong cardboard and covered with paper from Heartfelt Creations.


The stamp on the top is from Heartfelt Creations Moments With You stamp set. It was cut out with a Spellbinders Standard Circles large and colored with Tim Holtz Distress Markers. The circle of gems is from Want 2 Scrap. The flowers are Spellbinders Tattered Blossoms, stamped with the coordinating stamps from Heartfelt Creations.


The earrings were stamped and cut with the same Tattered Blossoms dies and stamps. They were then dipped into Ranger Ultra Thick Embossing Enamel that was melted in my Ranger Melt Art Melting Pot.


I am entering this in the following challenges:
  1. DL.Art - February Linky
  2. Every Day is an Occasion - February Linky
  3. Just B Creative Crazy - February Linky
Now it's your turn!! Head on over to Decorate to Celebrate to see the amazing projects my talented design team sisters have created for today's challenge. Then link up your 3D Flower or Birthday project...I can't wait to see what you create :)

Sunday, January 26, 2014

Stenciled Days 1 & 2

Happy Sunday, everyone!! I hope you are having a great weekend!! I have been taking an awesome online class called Stenciled. I have so many stencils that are just sitting in a drawer needing to be used so I thought this class would get me motivated to use them and it has. I am loving it :)


You all know how much I love layers and dimension. These cards are not my usual style...they are flat enough to mail without extra padding or postage!! This card was inspired from Day 1 - Inking and Masking. The paper is heavyweight cardstock from Canvas Corp. A section of the paper was masked to leave room for the sentiment. I used a Crafter's Workshop Chevron stencil and inked it with Tim Holtz Spiced Marmalade Distress Ink. I then flipped the stencil and inked it with TH Fired Brick. A circle stencil was used to add the dots of TH Picked Raspberry. Fired Brick was inked along the edges. The sentiment is from My Creative Time's Encouraging Quotes stamp set.


This card was inspired from Day 2 - Template Techniques. I had so much fun with this one!! The sentiment is from JustRite Stamps Live, Laugh, Love Stamp set. It was stamped in Versamark and then heat embossed with white embossing powder. A Tim Holtz Splatter Stencil was used to stamp the honeycomb stamp from Tim's Mixed Media stamp set in Spiced Marmalade. The Spiced Marmalade was then inked around the splatter stencil. I then rotated the stencil and stamped the circles from a Joann dollar bin stamp in Fired Brick, which was then inked through the splatter. The stencil was rotated one more time and inked with Peacock Feathers Distress Ink. Squeezed Lemonade and Fresh Mowed Grass Distress Inks were randomly added through the stencil. With a baby wipe, I wiped off the sentiment and then used a TH Pumice Stone Distress Marker to give the letters a shadow.

I am entering these in the following challenges:
  1. DL.Art - January Linky
  2. Just B Creative Crazy - January Linky
  3. 2 Creative Chicks - Anything Goes
Thanks so much for stopping by!!

Monday, November 25, 2013

Craft It Up & Link It Up #20 - Tag, You're It

Happy Monday!! I hope you had a wonderful weekend!! For my US friends, how are your plans coming along for Thanksgiving?? Are you traveling?? I can't wait for all the yummy goodies on Thursday...turkey and pumpkin pie :)


It's time for another fun challenge at Craftin Desert Divas!! The challenge this week is: Tag, You're It. We want to see your projects using a tag. The sponsors for this challenge are Too Cute by Jessica with a $20 gift card, and Cardz TV with a set of stamps.


For my project, I created a Christmas tag using several Tim Holtz products. The tag was cut with a TH Tag and Bookplate die. The papers are from My Mind's Eye Lost & Found Christmas stack. The trees were colored with TH Pine Needles and Walnut Distress Markers and cut out with the coordinating TH Holiday Joy Framelits. Santa was colored with Festive Berries and Black Soot Distress Markers and cut out with the coordinating Retro Christmas Framelits set. His beard and fur were covered with Ranger White Enamel Accents and he was popped up with foam tape for dimension. Merry Christmas was stamped with Versafine Black ink and then inked with Walnut Distress Ink and Festive Berries along the edges. It was covered with Glossy Accents and then popped up with foam tape when dry. The holly in the corner was stamped with Pine Needles Distress Marker and cut out with the coordinating Holiday Joy Framelits. The berries were added with Liquid Pearls.


I am entering this in the following challenges:
  1. Little Scrap Pieces - Anything Goes
  2. DL.Art - November Linky
  3. Sunday Funday - November Linky
  4. Just B Creative Crazy - November Linky
Now it's your turn!! Head on over to Craftin Desert Divas to see the amazing projects my talented design team sisters have created for today's challenge. Then link up your Tag, You're It project...I can't wait to see what you create :)

Wednesday, October 23, 2013

Happy Halloween

Happy Wednesday!! I hope you are having a great week!! It's been so cold here the last couple of days. It was in the 20's yesterday morning, as opposed to the 70's a year ago. Ugh. I'm so not ready for winter :( But, in the spirit of fall, I have a Halloween project to share with you today :)


This is a shadowbox project I created, using mostly Tim Holtz dies and stamps. The box was cut with Spellbinders Grand Squares dies and popped up with layers of foam tape for the dimension of the box. The paper is from My Mind's Eye. The moon in the corner was colored with a Mustard Seed Distress Marker and a TH Waterbrush. The bats are from Tim's Mini Halloween #1 set, stamped with Jet Black Archival Ink. The tree is a TH Branch Tree die, inked with TH's Gathered Twigs Distress Ink. The owl was stamped from the TH Mini Halloween #2 set. The fence is a TH On The Fence die, inked with Walnut Distress Ink. Happy Halloween is from the Mini Halloween #3 set, heat embossed with Zing Vanilla embossing powder.


The skeleton is from the Mini Halloween #2 set. It was heat embossed with Zing Vanilla embossing powder and fussy cut. The spider web is from TH's Mini Halloween #3 set, and it was also heat embossed with Zing Vanilla embossing powder. The spider is from the Mini Halloween set. Several of the elements were popped up with foam tape for dimension.

I am entering this in the following challenges:
  1. Simon Says Stamp Monday Challenge - Spooky
  2. Simon Says Stamp Wednesday Challenge  - Halloween or Halloween Colors
  3. Craftin Desert Divas - Halloween 
  4. DL.Art - October Anything Goes Linky 
  5. Sunday Funday #14 - Anything Goes 
  6. Just B Creative Crazy - October Linky 
  7. Funday Friday Challenge - Anything Goes  
  8. 2 Creative Chicks - Halloween
My new blog design is still a work in progress. I'm having the hardest time getting the colors changed in several text areas. I hope to have all the kinks worked out soon. Thanks so much for stopping by!! Have a great day :)

Sunday, September 22, 2013

Fall Art Journal Page

For my Early Christmas Giveaway, click HERE

Happy Monday!! This is a scheduled post, so I'm hoping everything works :) I have a fall journal page to share with you today.


It's been a while since I did this so I don't remember all of the items I used. The background was spritzed with water and then Dylusions sprays in Squeezed Orange, Pure Sunshine,Cherry Pie, Postbox Red and Back Marble. Crafter's Workshop Harlequin, Chevron and Numbers stencils were used with both sprays and water for a ghosting effect. The leaves are from the Dylusions Further Around the Block stamp set. They were colored in with several Dylusions sprays that were added to water brushes. They were outlined with a white Sakura Gelly Roll pen. Stamps from Paper Wings Productions Art Textures were stamped on the background with Wendy Vecchi Archival Inks in Potting Soil, Geranium and Orange Blossom. The text stamp is from the Tim Holtz Apothecary set. The birds are from Dylusions Birds on a Wire stamp set. The bottom border is from Dylusions Further Around the Block and colored in with Dylusions inks in water brushes.


The girl's head is from Dylusions Traveling Travis stamp set, and her body from Tallulah Tripp. She was colored in with Tim Holtz Distress Markers and a TH water brush. She was outlined with charcoal.


The sentiment is from Dylusions The Right words stamp set. It was outlined with charcoal.


Thanks so much for stopping by!! Remember, if you comment on my scheduled posts, you increase your chance of winning a set of Tim Holtz stamps and a My Mind's Eye paper stack!! Have a great day :)

LinkWithin

Related Posts Plugin for WordPress, Blogger...