H G Tut H C DT A F FB E P E Image Map
Showing posts with label Heat Embossing. Show all posts

Thursday, October 23, 2014

My Craft Spot Stamp Release Day 4!!

Welcome to the My Craft Spot Stamp Release party!! I'm so excited to be guest designing again for this release!! Each day this week we will be sharing projects to showcase five new stamp sets and several new SVG files!! Kimberly will have a giveaway every day this week, so be sure to leave a comment at My Craft Spot to be eligible for the daily prize. You'll also be treated to some amazing inspiration from the design team!! The party will end with a blog hop celebration on Saturday, where the full release is revealed and prizes will be given at each stop. Kimberly's new stamps and SVG files will also be available for purchase beginning that day :)

Today we are featuring the new Christmas Chalkboard stamp set and it is fabulous!! Throughout the week the design team will also be incorporating the new SVG files into their projects as well. (Unfortunately I won't until I get a cutting machine :)


For this card, I distressed the edges with a Zutter DIA. Dylusions White Linen was sprayed on the background for a snowy effect.


The gorgeous Sheer White Ribbon is from My Craft Spot. The flowers are from Wild Orchid Crafts.


The sentiment from Christmas Chalkboard was heat embossed with snow white embossing powder.


I am entering this in the following challenges:

1. DL.Art - October Linky
2. Simon Says Stamp Monday Challenge - Anything Goes

Be sure to head on over to My Craft Spot to see the amazing projects the DT has created - I guarantee you will be inspired!! And don't forget to leave a comment for a chance to win a $10 gift certificate to My Craft Spot.


Please come back tomorrow for Day 5!!

Friday, October 10, 2014

Merry Christmas

Happy Friday!! I hope you have fun plans for the weekend!! It's my turn to post on the Die-Versions blog and I have a Christmas tag to share with you today :)


I distressed the edges of the tag with a Zutter DIA. A Die-Versions Whispers Ornamental Fence die was layered over burlap. A Die-Versions Regal Reindeer was cut twice and popped up with foam tape. Red gems were added to the swirly antlers.


The flowers are a mixture of Wild Orchid Crafts and Petaloo. A Die-Versions Daisy Flair die was cut in vellum and tucked among the blooms. Merry Christmas is from Craftin Desert Divas Happy Celebrations stamp set. It was heat embossed with Recollections Blaze Embossing Powder.

I am entering this in the following challenges:

1. DL.art - October Linky
2. Dies R Us Challenge #11 - Gift Tags
3. Craft It Up & Link It Up - Anything But a Card


Mark your calendars for October 21...the Die-Versions Design Team will be hosting a Think Pink Blog Hop. You can participate by linking up your Think Pink projects...you could win a $25 gift certificate to shop at the Die-Versions store!!

Thanks so much for stopping by!! Have a great weekend :)

Sunday, September 21, 2014

Last Day to Enter Giveaway & Happy To Be Alive Tag

Happy Sunday!! I hope you are having a wonderful last weekend of summer (how is that even possible??!!) Today is the last day to enter my Thank You Giveaway!! If you haven't entered to win a set of Memory Box dies, click HERE for all the details!! If you have, thank you so, so much :)


I have a tag to share with you today. The papers are from The Paper Studio's Kirby Teesdale stack. The edges were distressed with a Zutter DIA and then inked with Tim Holtz Walnut Distress Ink. Memory Box Chloe Stems were adorned with gems and tucked behind the paper. The bottom circles are a Memory Box Loopy Rings dies.


The flowers are from Wild Orchid Crafts. A Memory Box Magic Flourish was cut in vellum and tucked among the blooms. The leaves are from My Craft Spot's Flowers Daisy die set. The sentiment is from My Craft Spot's Music stamp set. It was heat embossed with white embossing powder and then I ran some chalk over it for a chalkboard effect.


I am entering this in the following challenges:

1. My Craft Spot - Chalk Art (MCS products used: Music Stamp Set, Flowers Daisy Dies)
2. Simon Says Stamp Wednesday Challenge - Tag It
3. DL.art - September Linky
4. Little Scrap Pieces - Show It Off Saturday

Be sure to stop back tomorrow for the Die-Versions / Great Impressions Blog Hop!!


There will be lots of inspiration and you will have the chance to win some awesome prizes!!

I will announce the winner of my giveaway on Tuesday!! Thank you again for voting!!

http://indymermaid.blogspot.com/2014/09/thank-you-giveaway.html

Happy Sunday :)

Wednesday, June 11, 2014

We Go Together LIke the Moon & Stars!!

FOR MY DECORATE TO CELEBRATE FATHER'S DAY POST, CLICK HERE

Happy Wednesday!! This is my second post of the day. For my Decorate to Celebrate Father's Day post, please scroll down. It's my turn to post on the Craftin Desert Divas blog and I'm sharing a card with you today using the Perfect Pair stamp set :)


The papers are from DCWV's Stardust stack and were perfect with the die-cut moon, stars and sentiments!! A Tim Holtz Bigz Crescent Moon and Stars die was used, and the images were cut in gold foil. I hammered them a bit to give them a distressed look.


We Go Together Like...was embossed with gold embossing powder, as was...


The Moon & Stars. Both of these sentiments can be found on the Perfect Pair stamp set:


Aren't all of these sentiments fun??!!


I am entering this card in the following challenges:
  1. DL.Art - June Linky
  2. Funday Friday - Anything Goes
  3. Word Art Wednesday - Anything Goes
  4. Just B Creative Crazy - June Linky
Thanks so much for stopping by!! Have a great day :)

Monday, March 3, 2014

Craft It Up & Link It Up - Birthday Party

Happy Monday!! I hope you had a wonderful weekend!! Mine might have been better if not for the snow. Ugh. I am so over winter. It's March...spring is supposed to be on the way :(

It's time for another fun Craft It Up & Link It Up Challenge at Craftin Desert Divas. The theme this week is Birthday Party. Our sponsors are: Unity Stamp Company, Miriam's Crafting Supplies and Little Scraps of Heaven Designs.


Our sponsor Unity Stamp Company provided stamps for us to use today from the Birthday Jubilee stamp set. The base of the card is heavyweight cream cardstock from Canvas Corp.


The papers are from Authentique's Seasons Essentials paper stack. The edges were distressed with a Zutter Distress-It-All. Spellbinders Captivating Squares were used for the layers. The butterfly is a Spellbinders Fanciful Flight die. I added tape to the back of a piece of burlap to cut it so that the burlap would keep the shape and not fray.


This is my first attempt at the chalkboard technique. The Unity sentiment was stamped with Versamark and then heat embossed with white embossing powder. When the powder was almost dry, a piece of chalk was scribbled over the top.


The beautiful flowers were purchased from my friend Archana at CraftyCity. Spellbinders D-Lites Corner Sprigs were cut in vellum and tucked in behind.


I am entering this in the following challenges:
  1. Little Scrap Pieces - Show It Off Saturday
  2. DL.Art - March Linky
  3. Every Day is an Occasion - March Linky
  4. Just B Creative Crazy - March Linky
  5. My Sheri Crafts #128 - Bling it On
  6. Word Art Wednesday #121 - Anything Goes
  7. Funday Friday #39 - Florals 
  8. Seize The Birthday - Anything Goes
  9. Scrap It Girl March Challenge - Birthdays
  10. Party Time Tuesdays #161 - Anything Goes
  11. Through the Craft Room Door - Anything Goes
Now it's your turn!! Head on over to Craftin Desert Divas to see the amazing projects my talented design team sisters have created for today's challenge, then Craft It Up & Link It Up!! I can't wait to see what you create :)

Tuesday, January 28, 2014

Stenciled Day 4 - Part 2

And for the second card, I used another fun technique from Stenciled...embossing with stencils.


A piece of heavyweight cardstock from Canvas Corp was embossed with a Crafter's Workshop Cosmic Swirls stencil. The stencil was then placed back over the paper and it was inked with Tim Holtz Tattered Rose, Spiced Marmalade and Crushed Olive Distress Inks. A strip of washi tape was placed down the left side and then the embossed paper was placed on the base of the card. The bird is from Tim's Urban Tapestry stamp set. The edges of the paper were distressed with scissors. I was supposed to use a glassine bag behind the image but I couldn't find any in my very messy craft room, so I used a piece of TH Frosted Film. Unfortunately, it doesn't even show up in the picture. The sentiment is from Inspired By Stamping and it was heat embossed with white embossing powder and attached with Tim's Tiny Attacher. Silver sequins were then added.

I am entering this in the following challenges:
  1. DL.Art - January Linky
  2. Just B Creative Crazy - January Linky
  3. 2 Creative Chicks - Anything Goes
Card #3 follows...

Monday, December 23, 2013

Sleigh Bells Ring

Happy Christmas Eve, Eve!! Thank you all so much for the birthday wishes!! I appreciate it so much!! Are you all ready for Christmas?? It's coming, whether I'm ready or not :/ I'm sorry I've neglected my blog the last few weeks. I do have a few Christmas cards to share with you today :)


I couldn't let Christmas go by without using my favorite Sizzix 3D Flip Album die :) The base is heavyweight kraft cardstock from The Paper Studio. The rest of the papers are from My Mind's Eye.


There are the Tim Holtz Carolers again (I told you I there would be more projects to come :) All of the stamps used are from various TH stamp sets. The music is from Mini Holidays #2, the reindeer is from Mini Holidays #1 and the starburst is from Mini Holidays #4.


Joy is a TH die, cut inside a Spellbinders Labels 1 die. The tree is a TH Snow Tree die, and it was covered with Enamel Accents on the edges and Rock Candy Stickles inside.


Santa is from the Mini Holidays #1 set. The snowflakes are from TH's Holiday Joy Framelets. The banner is a Spellbiners Banner die. Believe and the sentiment are from My Craft Spot's Joy Filled Christmas set.


Here's a shot of it all folded out.


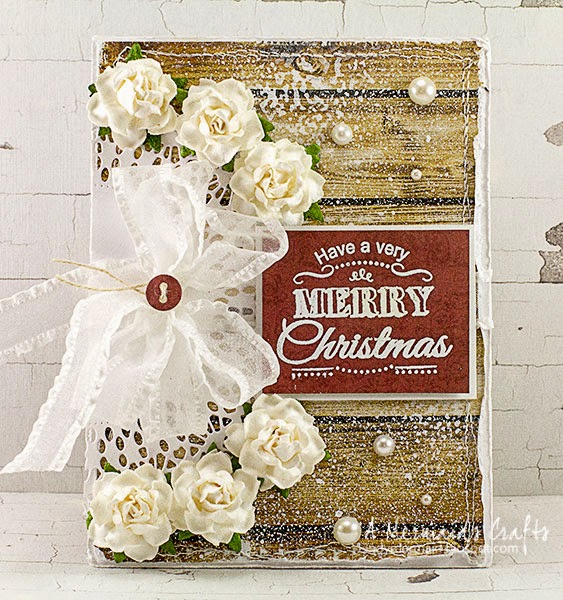
For this card, I used a Spellbinders M-Bossibilities 3D Floral Labels 4 embossing folder. Once it was embossed, the raised parts were sanded to bring out the texture. The sentiment is on a Spellbinders Labels 4 die, inked with TH Pine Needles Distress Ink. The sentiment is from TH's Mini Holidays #5 set. The crinkle ribbon was inked with Pine Needles Distress Ink. Merry Christmas and the holly leaves are from the TH Mini Holidays #4 set.


The base and layers of this card were created with Spellbinders Card Creator Basics A & B dies. The top layer was embossed with a snowflake embossing folder and sanded. The back line of trees is a TH Tree Line die. It's hard to tell, but the green paper was inked with Donna Salazar Mix'd Media ink in Jasmine to make it look like it's dusted with snow. The tall tree is a TH Snow tree die. It was inked with Jasmine and TH Walnut Distress ink on the base. The banner is a Spellbinders die, and the sentiment is from My Craft Spot's Joy Filled Christmas stamp set.


The deer is from TH's Holiday Joy Framelets. It was embossed with gold embossing powder.


Trees from TH's Reindeer Flight stamp set were stamped inside, along with the sentiment from My Craft Spot's Joy Filled Christmas.


I needed some gift card holders, so I used TH's Pocket Envelope die to create them. The paper is from My Mind's Eye. I hand cut the tree and sleigh from the paper and attached them with foam tape for dimension. The banner is a Spellbinders Ribbon Banner die, inked with Festive Berries and stamped with Merry Christmas from My Craft Spot's Joy Filled Christmas set.

I am entering the following challenges:
  1. Little Scrap Pieces - Anything Goes
  2. DL.Art - Christmas
  3. DL.Art - December Linky
  4. Sunday Funday - December Linky
  5. Just B Creative Crazy - December Linky
  6. 2 Creative Chicks - Christmas/Winter
Thanks so much for stopping by!! I will probably be away from my computer for the next few days to enjoy Christmas with my family, so I will be around to visit when I can. I have some very exciting news to share with you soon, along with a giveaway, so be sure to stop back by after the holidays!!

Merry Christmas!!
Merry Christmas!!
Merry Christmas!!

Saturday, December 14, 2013

Holly Jolly Christmas Blog Hop!!

Welcome to Craftin Desert Diva's Holly Jolly Christmas Blog Hop!!


I'm so happy that you could join us today!! If this is the first time that you have hopped with us, you won't be disappointed. This is the Craftin Desert Divas design team's first hop and I have to say my design team are all amazingly talented.

This is Day 1 and the start of the Holly Jolly Christmas Blog Hop! You will not only get some inspiration, but you could win GREAT prizes, too!! You must FOLLOW and COMMENT on all of the stops both days to have chance to win.

Here's the wonderful sponsors for this hop...


For this two day hop each blog will be offering a prize from one of the sponsors listed above. You must visit each stop both days to be eligible to win. Winners will be announced on Dec 18. The entire winning list will be posted on Craftin Desert Diva's website.

My sponsor for today is..

http://blog.tombowusa.com/

You could win Permanent Adhesive as well as a Refill Value Pack that includes 3 refills!! And their adhesive is awesome!!

You should have arrived from Michelle of Michelle's Cricut Fun. If you are just stopping by, you will want to start at the beginning at Craftin Desert Divas. You don't want to miss the chance at some awesome prizes!!

Here is my project....


The letters are heavyweight chipboard from Hobby Lobby. I covered them in My Mind's Eye Lost & Found Christmas paper. I used Tombow Permanent Adhesive to adhere all of the items to the letters.


As you can see, I love the Tim Holtz Victorian Carolers die (and adding bokeh to my pictures ;)!! I have to use them while I can during the season, so you will see them again on a project or two ;) For this one, I stamped the music stamp from Tim's Mini Holidays #2 set in Embossing Ink and then heat embossed it with copper embossing powder. I offset the black layer for a shadow effect.


For the O, I used one of the deer from Tim's Reindeer Flight die. He was covered in Glossy Accents and then a jingle bell collar was added.


Tim's Snow Tree die was used for the E. I coated the edges with White Enamel Accents and then filled in the rest with Rock Candy Distress Stickles. The stem was inked with TH Walnut Distress Ink.


For the L, I strung jingle bells on hemp twine and then wrapped them around the end. A Merry Christmas is from Tim's Mini Holiday's #5, and it was heat embossed with Fired Brick Distress Powder.


I am entering this in the following challenges:
  1. Craftin Desert Divas - Christmas
  2. Little Scrap Pieces - Anything Goes
  3. DL.Art - Christmas
  4. DL.Art - December Linky
  5. Sunday Funday - December Linky
  6. Just B Creative Crazy - December Linky
  7. 2 Creative Chicks - Christmas/Winter
  8. Cut It Up Challenge #34 - Christmas 
I am your last stop on the  hop. Below is the list of all the participants in case you get lost or want to revisit anyone. Thanks for stopping by...I hope you will join us tomorrow for more fabulous projects and prizes!!

Saturday Dec. 14

 1. Tara - http://www.craftindesertdivas.com/
 2. Kathy - http://3spoileddogs.blogspot.com/
 3. Karen - http://craftedwithlovebykaren.blogspot.com/
 4. Tracy - http://tracyscricutcorner.blogspot.com
 5. Migdalia - http://craftingwithcreativem.blogspot.com/
 6. Shelly - http://mypaperlove.blogspot.com/
 7. Emily - http://molliemugsblog.blogspot.com/
 8. Michelle B - http://michellescircutfun.blogspot.com
 9. Lisa - http://indymermaid.blogspot.com < YOU ARE HERE

Sunday Dec. 15

 1. Tara - http://www.craftindesertdivas.com/
 2. Lori - http://got2bcrafting.blogspot.com/
 3. Janis - http://pausedreamenjoy.blogspot.com/
 4. Michelle P - http://mumoftwoblog.blogspot.com
 5. Migdalia - http://craftingwithcreativem.blogspot.com/
 6. Kathy Jo - http://daisysanddaffodils.blogspot.ca/
 7. Donna K - http://createdbydonnak.blogspot.com
 8. Robin C - http://cutonedesignsbyrobin.blogspot.com/
 9. Mayra - http://mayrasdesigns.blogspot.com/
10. Jessica - http://craftinandstampin.blogspot.com

Thursday, December 5, 2013

Sending Love at Christmas

Happy Thursday!! I hope you are having a wonderful first week of December!! We are under a winter storm warning, with it expected to hit tonight with lots of snow and ice. We are in the area with a strong possibility of losing power, so I may not be able to visit you for a few days. I'm trying to get in a quick post before I head to the store for supplies, just in case :)


I have a Christmas bag to share with you today. I started with a Copper Foil Engraving Blank from Royal Langnickel...this stuff is so awesome!! It really makes the embossing pop. I also have silver, gold and rainbow blanks, so you will be seeing lots more projects with it from me :) A Spellbinders Roman Romance M-Bossibilities embossing folder was used and then sanded to bring out the copper and awesome texture.


The ornament is a Spellbinders Heirloom Ornaments 2011. The stamp is from JustRite's Deck the Halls stamp set. A Spellbinders Classic Circle Small was used for the inside sentiment, which is also from JustRite's Deck the Halls set. The stamps were stamped with Tim Holtz Distress Embossing Ink and then heat embossed with copper embossing powder. The sparkly copper ribbon is from my stash.


I am entering this in the following challenges:
  1. JustRite Friday Challenge #111 - It's in the Bag
  2. Simon Says Stamp Wednesday Challenge - Make Your Own Background
  3. DL.Art - December Linky
  4. Sunday Funday - December Linky
  5. Just B Creative Crazy - December Linky
  6. Paper Playtime #24 - Anything Goes
  7. Funday Friday #28 - Get in the Spirit
Thanks so much for stopping by!! Have a wonderful weekend and I'll be by to visit when I can :)

Wednesday, October 23, 2013

Happy Halloween

Happy Wednesday!! I hope you are having a great week!! It's been so cold here the last couple of days. It was in the 20's yesterday morning, as opposed to the 70's a year ago. Ugh. I'm so not ready for winter :( But, in the spirit of fall, I have a Halloween project to share with you today :)


This is a shadowbox project I created, using mostly Tim Holtz dies and stamps. The box was cut with Spellbinders Grand Squares dies and popped up with layers of foam tape for the dimension of the box. The paper is from My Mind's Eye. The moon in the corner was colored with a Mustard Seed Distress Marker and a TH Waterbrush. The bats are from Tim's Mini Halloween #1 set, stamped with Jet Black Archival Ink. The tree is a TH Branch Tree die, inked with TH's Gathered Twigs Distress Ink. The owl was stamped from the TH Mini Halloween #2 set. The fence is a TH On The Fence die, inked with Walnut Distress Ink. Happy Halloween is from the Mini Halloween #3 set, heat embossed with Zing Vanilla embossing powder.


The skeleton is from the Mini Halloween #2 set. It was heat embossed with Zing Vanilla embossing powder and fussy cut. The spider web is from TH's Mini Halloween #3 set, and it was also heat embossed with Zing Vanilla embossing powder. The spider is from the Mini Halloween set. Several of the elements were popped up with foam tape for dimension.

I am entering this in the following challenges:
  1. Simon Says Stamp Monday Challenge - Spooky
  2. Simon Says Stamp Wednesday Challenge  - Halloween or Halloween Colors
  3. Craftin Desert Divas - Halloween 
  4. DL.Art - October Anything Goes Linky 
  5. Sunday Funday #14 - Anything Goes 
  6. Just B Creative Crazy - October Linky 
  7. Funday Friday Challenge - Anything Goes  
  8. 2 Creative Chicks - Halloween
My new blog design is still a work in progress. I'm having the hardest time getting the colors changed in several text areas. I hope to have all the kinks worked out soon. Thanks so much for stopping by!! Have a great day :)

Monday, March 25, 2013

Life Isn't About Finding Yourself

Happy Monday!! What a way to wake up this morning...snow, snow, lots of snow :( But I'm not complaining...it was a great weekend!! My team is still alive in the NCAA Tourney!! Love March Madness :)


I have a quick card to share with you today. I've been wanting to use my new Dylusions Couture Collections stamps, so I pulled them out for this card. The dress and hat were stamped on Strathmore Watercolor paper, colored with Tim Holtz Barn Door and Fired Brick Distress Markers and a TH waterbrush, and then fussy cut.


The base of the card is black cardstock from The Paper Studio. The next two layers are Spellbinders Grand Labels 4, cut with heavyweight paper from Canvas Corp. The bottom layer was inked with TH Barn Door and Fired Brick Distress Inks. On the next layer, Paris from a Wendy Vecchi Art Classic Words stencil was inked with TH Embossing Ink and then heat embossed with Ranger clear embossing powder. It was then sponged with Old Paper, Tea Dye, Frayed Burlap and Walnut Distress Inks. The postcard stamp from the Tim Holtz Paris to London set was stamped in Old Paper across the background. Then the Fleur de Lis stamp was inked with Tea Dye and stamped randomly. The Eiffel Tower from the same set was stamped with Jet Black Versafine ink. The banner along the bottom is a Tim Holtz Tattered Banner die cut, inked with Old Paper, Tea Dye and Walnut Distress Inks.


A Spellbinders Card Creator Matting Basics A die was inked with Barn Door and Fired Brick, with Walnut around the edges. The sentiment is from the Tim Holtz Mini Classics stamp set.


I'm entering this in the following challenges:
  1. Simon Says Stamp and Show - Quotable
  2. DL.Art - March Linky Party
  3. Sunday Funday #7 - March Linky Party
Thanks so much for stopping by today!! Have a wonderful day :)

PRODUCTS USED:

LinkWithin

Related Posts Plugin for WordPress, Blogger...